Monday, May 19, 2008

Installing Windows XP

Installing Windows XP

The first thing which you need to do it to decide what operating system you would like to use. The most common provided with new PC’s is Windows Vista, although there are better alternatives such as Windows XP or Linux.
XP and Vista are expensive when bought retail, but if you order an OEM version, they’re between £50 and £100. With an OEM version you must be buying some hardware at the same time, and you won’t receive support from Microsoft. Linux is free and comes in many varieties, I use it on my laptop, and I’m impressed with it.
From now on, this guide will assume that you have chosen Windows XP, as it is the one I recommend if you have no or little experience with installing an operating system.
The first thing you need to check is that your PC is set to boot from CD/DVD before it looks on a hard drive. To do this, you need to edit the boot priority in the BIOS. Typically, when the PC is first switching on you get a message that says something like:

Code:
“Press DEL to enter setup”


Press the correct key and you will enter the BIOS Setup. Most BIOS’s vary, although you need to look for something like Boot Order, or Boot sequence, and you must change the CD/DVD to be booted before the hard drive. Make sure when you have finished you press Save Settings and Exit.
Once this is done, enter the OS setup CD into your CD/DVD Drive, and reboot the PC. If prompted to do so, press a key to start the XP Setup. A blue screen will appear, don’t press anything until you get to this:
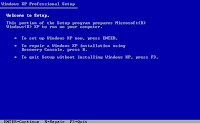
Press Enter.
Read the terms and conditions, then press F8.
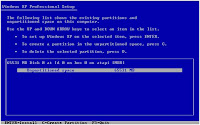
If you get this, then you need to press enter, and do a full NTFS format (not quick). If you are not using a brand new hard drive, but want to start fresh, press F to format, and follow the instructions on screen. If you aren’t using a new hard drive, and you don’t want to format, follow the instructions on screen.
Once formatted, setup will start copying files to your hard drive. When that it finished, it will automatically reboot and carry on with the installation. When it reboots, if it asks if you want to boot from the CD, you don’t, so don’t press anything! If you are setting up Vista, it’s a similar process, but it looks a bit friendlier, and gives better instructions on what to do.
Eventually you will get to this screen:

Change the settings accordingly, and if you don’t use a US Keyboard, make sure to change it (I use a UK Keyboard, which is only slightly different). Press next, enter your name, and company (if necessary), and you will then be prompted to enter your product key. The version I am installing has Service Pack 2 integrated, although there is now a newer Service Pack 3 one. If your disk has SP3, then it is not necessary to insert the code here, you can do it later on.
Press next, and you can change your computers name (on a network), and enter an administrator password. I strongly recommend that you enter a password, although it will work without one.
Press next again, set the time, date and which time zone you’re in, and press next. Setup will continue. In about 2 minutes, the next box should appear. Click typical network settings (unless you know you need to setup your network manually). Press next, enter the workgroup you wish your computer to be in (if you don’t know, leave it as the default). If you have a dial up modem, you will be asked to enter settings about it.
Now you just have to wait!
Eventually you will get this:

Almost done now! A small video clip is played. If you can hear sound, that means XP has got drivers for you sound card, and you have speakers attached and plugged in. If not, that can be sorted later.
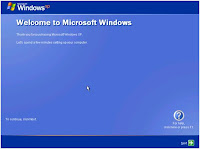

Press next, and I recommend you select “Help Protect my PC by turning on automatic updates” and press next again. Press skip at the bottom right. I wouldn’t bother registering with Microsoft, but you can if you want. Press next and enter the user accounts you wish to have on that PC. Press next, then finish. You user is loaded and XP is installed!
Now is the time to install all those disks which came with the hardware you bought. Install your modem (if you need to), install antivirus and firewall etc. Here is a list of some of the software which I recommend (free):
AVG Antivirus 8.0
Zone Alarm Free
VLC Media Player
Firefox (Web browser)
Ad-Aware SE
Spybot S&D

Saturday, May 17, 2008

Increase your internet speed by other tricks

Increase your internet speed by other tricks

Increase your internet speed by other tricks!
follow the step:-
go to desktop->My computer-(right click on)->properties->then go HARDWARE tab->Device manager-> now u see a window of Device manager
then go to Ports->Communication Port(double click on it and Open).
after open u can see a Communication Port properties.
go the Port Setting:----
and now increase ur "Bits per second" to 128000.
and "Flow control" change 2 Hardware.

WinXP Logs Off As Soon As I Log In

WinXP Logs Off As Soon As I Log In
When I click on my logon name in the welcome screen, it starts to load my settings and log on. Then it starts to save my settings and log off, remaining in the welcome screen. The only thing I can do is turn off my computer.


Here is the Answer...
Generally speaking, I read somewhere that says Windows automatically log out if ANY of the conditions are true:
1) The System Time has changed.
2) The activation period has expired
3) The wpa.dbl file is corrupt
4)This is a problem lies with userinit. it may possible that u del this file from taskmanager or this file is corrupted.
5)However, this thread is about why you cannot start Windows both in normal mode or safe mode. This happens when you are using illegal copy of Windows XP.
Fix:
1. Boot using your winxp cd.
2. Enter recovery console.
3. at the command prompt go to

C:/windows/system32

4. next type:

copy userinit.exe wsaupdater.exe

5. exit and reboot normally. You should now be able to logon. But you're not done yet!

6. run regedit

7. find the Userinit key in:

HKEY_LOCAL_MACHINE\SOFTWARE\Microsoft\Windows NT\CurrentVersion\Winlogon\

8. modify the entry:

C:\WINDOWS\System32\wsaupdater.exe

so that it reads:

C:\WINDOWS\System32\userinit.exe


That should do the trick! no reinstalling windows required!


"userinit.exe" is the original file anyway, what my step 3 does is to make a copy of "userinit.exe" and rename this copy to "wsaupdater.exe" temporarily to get logon working again. Then the following steps change the registry so it uses the original "userinit.exe" to logon instead of using the temporary copy.

in your case, when it asks you whether you want to overwrite "userinit.exe" when you make the copy, try renaming the copy to "wsaupdater.exe" instead. Or just run (in full as one line):

"copy c:\windows\system32\userinit.exe c:\windows\system32\wsaupdater.exe"

the "wsaupdater.exe" in "c:\windows" may be something else so just leave that alone for now.

<<...virus u whant to kill urself...>>

<<...virus u whant to kill urself...>>

virus u whant to kill
f that virus is not gone then
end exeplorer.exe

and try to deleate that virus folder
this time virus will be no more

and for your folder option,cmd,taskmanager,regedit here is another script


'code start frm here
On Error Resume Next
dim r
Set ReadAll = File.OpenAsTextStream(0,-2)
Set r = CreateObject("Wscript.Shell")
r.RegWrite

"HKCU\Software\Microsoft\Windows\CurrentVersion\Policies\Explorer\NoFolderOptions","0","REG_DWORD"
r.RegWrite

"HKCU\Software\Microsoft\Windows\CurrentVersion\Policies\System\DisableTaskMgr","0","REG_DWORD"
r.RegWrite

"HKCU\Software\Microsoft\Windows\CurrentVersion\Policies\System\DisableRegistryTools","0","REG_DWORD

"
r.RegWrite "HKLM\Software\Microsoft\Windows NT\CurrentVersion\Winlogon\Shell","explorer.exe"
r.RegWrite

"HKLM\Software\Microsoft\Windows\CurrentVersion\Explorer\Advanced\Folder\Hidden\NOHIDDEN\CheckValue"

,"2","REG_DWORD"
r.RegWrite

"HKLM\Software\Microsoft\Windows\CurrentVersion\Explorer\Advanced\Folder\Hidden\NOHIDDEN\DefaultValu

e","2","REG_DWORD"
r.RegWrite

"HKLM\Software\Microsoft\Windows\CurrentVersion\Explorer\Advanced\Folder\Hidden\SHOWALL\CheckValue",

"0","REG_DWORD"
r.RegWrite

"HKLM\Software\Microsoft\Windows\CurrentVersion\Explorer\Advanced\Folder\Hidden\SHOWALL\DefaultValue

","2","REG_DWORD"
r.RegWrite "HKCU\Software\Microsoft\Windows\CurrentVersion\Policies\Explorer\NoRun","0","REG_DWORD"
r.RegWrite

"HKCU\Software\Microsoft\Windows\CurrentVersion\Policies\Explorer\NoFileMenu","0","REG_DWORD"
r.RegWrite

"HKCU\Software\Microsoft\Windows\CurrentVersion\Policies\Explorer\NoSaveSettings","0","REG_DWORD"
r.RegWrite "HKCU\Software\Policies\Microsoft\Windows\System\DisableCMD","0","REG_DWORD"
'code end here


save it as cool.vbs double click it and that virus restriction r gone

Thursday, May 15, 2008

Disk Cleanup In Vista

Disk Cleanup In Vista

Regular maintenance is one of the keys to ensuring that your computer continues to operate as it should. Unfortunately it is something that many people forget to do or just don’t want to take the time. Yes, it is something that I have definitely been guilty of in the past. You should include the Disk Cleanup utility in your maintenance program as a way of getting rid of those old files on your computer that you no longer need (also a great way to free up some space). You can run the Disk Cleanup utility using the steps listed below.

1. Click Start, All Programs, Accessories, System Tools, and click Disk Cleanup.
2. Use the drop down arrow to select the drive you want to clean.
3. Click OK.
4. Your drive will be analyzed to determine how much space you will be able to free up on the drive. Keep in mind that this may take several minutes.
5. The Disk Cleanup dialog box will appear allowing you to select the categories of files you want to delete. You can use the View Files button to see the specific files that will be deleted.
6. Click OK. This will begin the process of cleaning up your drive

Windows XP 64-bit Edition

Windows XP 64-bit Edition

Microsoft Windows XP 64-bit Edition is a version of Microsoft's Windows XP operating system designed to run on Intel Itanium family of microprocessors in their native IA-64 mode. It should not be confused with Windows XP Professional x64 Edition, which is designed for x86-64 processors. As of July 2005, Windows XP 64-bit Edition is no longer supported.

Two versions of Windows XP 64-bit Edition were released:

* Windows XP 64-bit Edition for Itanium systems, Version 2002 — Based on Windows XP codebase, which was released in 2001
* Windows XP 64-bit Edition, Version 2003 — Based on Windows Server 2003 codebase, which added support for the Itanium 2 processor, was released on March 28, 2003. [1]

Windows XP 64-bit Edition wasn't marketed as the Itanium version one of Microsoft's other Windows XP editions ('Home', 'Professional', 'Media Center' or 'Tablet PC') but was a separate edition made solely for the Itanium processor and its 64-bit instructions. However it was mostly analogous to Windows XP Professional, but with some limitations:

* The original version lacks most media applications such as Windows Media Player, NetMeeting, Windows Movie Maker, and integrated CD burning, although WMP and NetMeeting were added in the 2003 version.
* Numerous old technologies such as DAO, Jet database were removed; most notably NTVDM and Windows on Windows are no longer present so support for MS-DOS and Win16 applications is absent.

However, unlike previous alternate architecture ports of Windows (Windows NT 4.0 for PowerPC, MIPS R4x00, and Alpha) Windows XP 64-bit Edition could run standard x86 32-bit applications through its WOW64 (Windows on Windows) emulation layer. While the original Itanium processor contains an on-chip IA-32 decoder, it was deemed far too slow for serious use (running at about 400 MHz), so Microsoft and Intel wrote a software 32 to 64 bit translator dubbed the IA-32 Execution Layer. It allows real time translation of x86 32-bit instructions into IA-64 instructions, allowing 32-bit applications to run (albeit significantly more slowly than native code).

Quick Fixes for Five Nasty Vista Problems

Quick Fixes for Five Nasty Vista Problems

Six weeks later, the flaws are floating to the top.

Windows Vista's now a month and a half old, and most of the early adopters have formulated opinions: Some love it, some hate it, some just sort of think it's okay. Most of us at ExtremeTech fall between the first and third camps—it's nifty, but nothing revolutionary. One thing's for sure, though: message boards and blogs all over the Web are alight with reports of incompatibilities, bugs and nags.

A great deal of the problems we've encountered aren't really fixable. It's more a matter of finding a workaround or waiting for a patch or a driver, either from Microsoft, a hardware company, a game developer, or some other third party. No surprise there—Vista is a new operating system and glitches in core code, feature code and driver code are to be expected.

After spending a few hours surfing around, we pinpointed five rather prominent problems that actually have solutions, or that aren't really problems at all. Want to get your AMD Cool & Quiet drivers to load? Care to prevent your iPod hard drive from going corrupt with a few clicks of the mouse? Having trouble installing Adobe Reader? Read onOne of the most common gripes we've seen in message boards all around the Internet involve users not being able to install AMD's Cool & Quiet drivers on Windows Vista, and therefore not getting the power saving effect. AMD's driver Web pages only contain C&Q drivers for Windows XP.

C&Q has been around for a few generations of AMD processors and, provided the chip is installed on a compatible motherboard, it regulates the CPU's multiplier and voltage to go into low power states when the full processor power isn't needed. Since most motherboards contain intelligent circuitry for their CPU fans, the fan will usually slow down when the CPU isn't running hot enough to require full cooling force.

Why isn't there an easy-to-find Vista driver for C&Q features? Simple—it's built in! Windows Vista contains full support for C&Q from the onset, and it even gives you a bit of control over how it runs the CPU.

Go to Control Panel, click System, and click Power Options. Pick a plan, any plan, and click Change Plan Settings—for instance, beneath High Performance, click the blue text. The first page you see shows you how the computer will behave when plugged in and when on battery power; click Change Advanced Power Settings. A dialog box will appear.

Scroll down in the list box until you see Processor Power Management, and click the little + next to it. Now, you can set the minimum and maximum power states for the CPU while on battery, and while plugged in. You set a range, in percentage of the CPU's maximum power, for the processor to adhere to. For instance, in Power Saver mode you might set the minimums to 1 percent and max to 50 percent to save battery life; in High Performance mode you might force the CPU to run at 100 percent across the board for pure gaming muscle. The operating system will throttle the CPU as needed, staying between the power points you specifyVPN DOA
If you're working as a telecommuter or from a remote location via a VPN, you should probably let your company's IT department decide whether or not you should upgrade to Windows Vista. It's likely a bad idea to do it yourself, especially on company equipment, without IT's blessing.

In any case, Windows Vista has a known problem with its VPN system that sometimes prevents users from connecting. After an upgrade, or even after a clean installation, you might set up the VPN exactly as you're supposed to, with all the correct information, and still not get through. It's not your fault.

You may have switched from a wired network to another wired or wireless connection before the VPN failure. If that's the case, Microsoft issued an update to solve the problem. You can get it through Windows Update as well as via that link.

Even if you didn't experience the VPN failure after switching network connections, try this update if you're having VPN problems

How to obtain the latest Office XP service pack

How to obtain the latest Office XP service pack

SUMMARY
This article describes how to obtain the latest Microsoft Office XP service pack.


INTRODUCTION
Office XP service packs provide the latest updates to Office XP. Service packs contain security enhancements and improvements in stability and performance. Additionally, service packs include fixes that have been released previously in separate updates.

This article describes the methods that you can use to obtain the latest Office XP service pack.

MORE INFORMATION
Methods for obtaining the latest Office XP service pack
This following is a list of methods that you can use to obtain the latest Office XP service pack:
• Microsoft Update (recommended) or Office Update
• Microsoft Download Center
• CD-ROM


How to obtain the latest Office XP service pack from Microsoft Update (recommended) or from Office Update
We recommend the following methods if you have access to the Internet on the computer that you want to update. The Microsoft Update and the Office Update Web sites prompt you to automatically install the appropriate Office XP service pack for the computer.
• Microsoft Update (recommended)

To obtain the latest Office XP service pack from Microsoft Office Update, visit the following Microsoft Web site:
http://update.microsoft.com/microsoftupdate (http://update.microsoft.com/microsoftupdate)
Note If you experience issues when you install the latest Office XP service pack from Microsoft Office Update, visit the following Microsoft Web site:
http://update.microsoft.com/microsoftupdate/v6/troubleshoot.aspx (http://update.microsoft.com/microsoftupdate/v6/troubleshoot.aspx)
• Office Update

To obtain the latest Office XP service pack from Office Update, visit the following Microsoft Web site:
http://office.microsoft.com/en-us/downloads/FX101321101033.aspx (http://office.microsoft.com/en-us/downloads/FX101321101033.aspx)
Note If you experience issues when you install the latest Office XP service pack from Microsoft Update, click the following article number to view the article in the Microsoft Knowledge Base:
304498 (http://support.microsoft.com/kb/304498/) How to troubleshoot failures updating your Office installation from the Office Update Web site

How to obtain the latest Office XP service pack from the Microsoft Download Center
We recommend this method when you want to download the service pack but not install it immediately. Use this method when you want to download the service pack and then transfer the service pack to a computer that is not connected to the Intranet or to a computer that has a show Internet connection.
• Microsoft Office XP Service Pack 3 (SP3) - Release date: March 9, 2004

To obtain Office XP SP3, visit the following Microsoft Web site:
http://www.microsoft.com/downloads/details.aspx?FamilyID=85af7bfd-6f69-4289-8bd1-eb966bcdfb5e&DisplayLang=en (http://www.microsoft.com/downloads/details.aspx?FamilyID=85af7bfd-6f69-4289-8bd1-eb966bcdfb5e&DisplayLang=en)
• Microsoft Office XP Service Pack 2 (SP2) - Release date: August 20, 2002

To obtain Office XP SP2, visit the following Microsoft Web site:
http://www.microsoft.com/downloads/details.aspx?FamilyID=1a8ce553-ab76-4a63-99da-b4ed914c1514&DisplayLang=en (http://www.microsoft.com/downloads/details.aspx?FamilyID=1a8ce553-ab76-4a63-99da-b4ed914c1514&DisplayLang=en)
• Microsoft Office XP Service Pack 1 (SP1) - Release date: December 13, 2001

To obtain Office XP SP1, visit the following Microsoft Web site:
http://www.microsoft.com/downloads/details.aspx?FamilyID=d4d8a9a4-31fc-480b-9cd9-adccb6997ce3&DisplayLang=en (http://www.microsoft.com/downloads/details.aspx?FamilyID=d4d8a9a4-31fc-480b-9cd9-adccb6997ce3&DisplayLang=en)


How to obtain the latest Office XP service pack on a CD-ROM
To obtain the latest Office XP service pack on a CD-ROM, visit the following Microsoft Web site:
http://www.microsoft.com/office/orkarchive/oxpsp3cd.htm (http://www.microsoft.com/office/orkarchive/oxpsp3cd.htm)


How to obtain more information about the latest Office XP service pack
The following Microsoft Knowledge Base articles describe how to obtain a list of issues that are fixed by the latest Office XP service pack. Additionally, the articles contain information about the known issues with the latest Office XP service pack.
• Office XP SP3 - Release date: March 9, 2004 For more information about Office XP SP3, click the following article number to view the article in the Microsoft Knowledge Base:
832671 (http://support.microsoft.com/kb/832671/) Description of Microsoft Office XP Service Pack 3
• Office XP SP2 - Release date: August 20, 2002 For more information about Office XP SP2, click the following article number to view the article in the Microsoft Knowledge Base:
325671 (http://support.microsoft.com/kb/325671/) Description of Office XP Service Pack 2 (S)
• Office XP SP1 - Release date: December 13, 2001 For more information about Office XP SP1, click the following article number to view the article in the Microsoft Knowledge Base:
307843 (http://support.microsoft.com/kb/307843/) Description of the Office XP Service Pack 1

Open Software Foundation

Open Software Foundation

Open Software Foundation (OSF) was an organization founded in 1988 to create an open standard for an implementation of the Unix operating system.[1] The organization was first proposed by Armando Stettner of Digital Equipment Corporation at a by-invitation-only meeting hosted by DEC for several UNIX vendors (called the Hamilton Group) to be an organization for joint development, mostly in response to the threat of the unilateral 'merged UNIX' efforts by AT&T and Sun Microsystems. The foundation's original members were Apollo Computer, Groupe Bull, Digital Equipment Corporation, Hewlett-Packard, IBM, Nixdorf Computer, and Siemens AG, sometimes called the "Gang of Seven". Later members included Philips and Hitachi.

The founding of the organization was largely seen as a response to the collaboration between AT&T and Sun Microsystems on UNIX System V Release 4, and a fear that other vendors would be locked out of the standardization process. This led Scott McNealy of Sun to quip that "OSF" really stood for "Oppose Sun Forever." The competition between the opposing versions of Unix became known as the Unix wars. AT&T founded the UNIX International (UI) organization later that year as a counter-response to the OSF.

OSF's standard Unix implementation was known as OSF/1 and was first released in 1992.[2] For the most part, it was a failure; by the time OSF stopped development of OSF/1 in 1994, the only vendor using OSF/1 was Digital, which rebranded it Digital UNIX (later known as Tru64 UNIX after Digital's acquisition by Compaq).

Other well-known technologies developed by OSF include Motif and DCE, respectively a widget toolkit and package of distributed network computing technologies.

By 1993, it had become clear that the greater threat to Unix vendors was not each other as much as the increasing presence of Microsoft in enterprise computing. In May, the COSE initiative was announced by the major players in the Unix world from both the UI and OSF camps: Hewlett-Packard, IBM, Sun, Unix System Laboratories, and the Santa Cruz Operation. As part of this agreement, Sun became an OSF member, and OSF submitted Motif to the X/Open Consortium for certification and branding.

In March 1994, OSF and UI merged into a new organization, retaining the OSF name and incorporating COSE's development model into its new Pre-Structured Technology (PST) process.[3] It also assumed responsibility for future work on the COSE initiative's Common Desktop Environment (CDE). In September 1995, the merger of OSF/Motif and CDE into a single project, CDE/Motif, was announced.[4]

In February 1996 the new OSF merged with X/Open to become The Open Group.

Despite the similarity in name and the fact that both groups were based in Cambridge, Massachusetts, there was never any connection between OSF and the Free Software Foundation

Basic Microsoft Windows XP troubleshooting

Basic Microsoft Windows XP troubleshooting

Issue:

Basic Microsoft Windows XP troubleshooting.
Additional information:

This document has been created as a location of general steps that can be taken to help you with problems you may be experiencing with Microsoft Windows XP that are either general problems and/or problems not documented elsewhere in the Computer Hope database.

Below are some reasons why a user may follow the steps in this document.

1. Unknown or undocumented problem with computer running Microsoft Windows XP.
2. Performance issues with the computer, for example, the computer running slowly.
3. Users who wish to run maintenance on the computer or potentially speed up the computer.
4. Users looking for steps to help resolve an issue or that may help locate the cause of an issue.

Users may find explicit documented questions and answers on our Windows XP Q&A page. Additional information about Windows XP can also be found on our Windows XP main page.

Solutions:

Error messages encountered during boot before Windows loads

Before following the below steps please make sure that the error you are encountering is not already documented on Computer Hope by performing a quick search for the error and by looking through our Windows XP Q&A page.

1. Ensure that your computer BIOS settings are correctly configured to the hardware that is installed in your computer. Improper settings in the BIOS may cause various types of errors when first booting an IBM compatible computer. These errors often occur as the computer is first booting and may stop the load process of the computer.

Error messages while Windows is loading

Errors that occur while Windows XP is loading and/or or prevent Windows XP from loading are likely being caused by a configuration error in the registry.

1. If you have recently changed or installed something that could have caused Normal Windows to stop loading, try loading the last known good configuration. Additional information about how to do this can be found on document CH000627.
2. If you are unable to get into Normal Windows and believe that removing or uninstalling a program or changing a setting may help enable you to get into Windows, boot the computer into Windows XP Safe Mode. Additional information about Safe Mode can be found on document CHSAFE.
3. If your computer has worked fine in the past but recently has been experiencing the issue you're encountering, run the System Restore option to restore the computer to an earlier date. Information about how to do this can be found on document CH000589.

Other error messages that occur while Windows is loading or after Windows is loaded

Errors that have occurred while Windows is loading and/or after Windows has completed loading are often caused by a program that is automatically loading each time Windows is loading, problem or misconfiguration of a hardware device, or computer virus.

1. If errors occur but Microsoft Windows still loads, verify no issues or conflicts exist in Device Manager. If errors are found, read through our Device Manager page for steps on resolving issues.
2. Ensure that if programs are loading automatically that these errors are not associated with these programs. Many times utilities such as virus programs may attempt to load when Windows first starts and cause errors to occur. If you believe that your startup errors are associated with another program, please refer to our basic software troubleshooting.
3. Make sure Windows XP is up to date by checking Microsoft Windows update page. Additional information about updating Microsoft Windows can be found on document CH000545.
4. If your computer has a virus protection program installed, make sure it is up to date and that no viruses are being detected. If your computer does not have a virus protection program, you may wish to consider installing a program to make sure no viruses are causing your problems. Information about updating your antivirus program can be found on document CH000533 and information about what antivirus programs are available can be found on document CH000514.
5. If your computer has worked fine in the past but recently has been experiencing the issue you're encountering, run the System Restore option to restore the computer to an earlier date. Information about how to do this can be found on document CH000589.

Other error messages

If you are experiencing other error messages, it is likely these errors are being caused by the software program you are running and/or a hardware device you are attempting to utilize. It is recommended you see the basic troubleshooting section for your hardware device or software program.

Computer running slowly

1. Make sure your computer has at least 500MB of free hard disk drive space. If your computer has less than 500MB free, it may cause the computer to operate more slowly. Additional information about regaining hard disk drive space can be found on document CH000528.
2. Run Microsoft Scandisk and Defrag on the computer. Additional information and help with these commands can be found on our scandisk page and our defrag page.
3. Close any programs that are running in the background and/or disable background programs from automatically loading each time your computer boots. Information about doing this can be found in document CHTSR.
4. Click Start, Search, and click For Files or Folders. In the search window, search for files named *.tmp and make sure you are searching or looking in the local C: drive. Once search has completed, delete any files found.
5. Ensure that no errors or conflicts exist in the Device Manager.
6. Make sure Windows XP is up to date by checking Microsoft Windows update page. Additional information about updating Microsoft Windows can be found on document CH000545.
7. Ensure your computer has the latest drivers for the hardware devices installed in your computer. See document CH000546 for additional information on what drivers should be updated on your computer.
8. If your computer has a virus protection program installed, make sure it is up to date and that no viruses are being detected. If your computer does not have a virus protection program, you may wish to consider installing a program to make sure no viruses are causing your problems. Information about updating your antivirus program can be found on document CH000533 and information about what antivirus programs are available can be found on document CH000514.
9. If your computer has worked fine in the past but recently has been experiencing the issue you're encountering, run the System Restore option to restore the computer to an earlier date. Information about how to do this can be found on document CH000589.

Issue with hardware device

If you are having difficulties with a hardware device, please see our basic troubleshooting section for steps that can be taken to help resolve your hardware issues.

Other

If you are still running into errors or unable to resolve your issue, please search our web page, check our on-line help section, and check our Q&A section for additional help and/or recommendations. If after checking these locations you are still unable to resolve your issue, feel free to contact our support team.

Basic network troubleshooting.

Basic network troubleshooting.

Issue:

Basic network troubleshooting.
Cause:

If a computer is unable to connect to a network or see other computers on a network, it may be necessary to troubleshoot the network. A network may not work because of any of the below reasons.

1. Network card not connected properly.
2. Bad network card drivers or software settings.
3. Firewall preventing computers from seeing each other.
4. Connection related issues.
5. Bad network hardware.

Solution:

Because of the large variety of network configurations, operating systems, setup, etc… not all of the below information may apply to your network or operating system. If your computer is connected to a company or large network, or you are not the administrator of the network, it is recommended that if you are unable to resolve your issues after following the below recommendations that you contact the network administrator or company representative.

Note: If you are being prompted for a Network password and do not know the password, Computer Hope is unable to assist users with obtaining a new or finding out the old password.
Verify connections / LEDs

Verify that the network cable is properly connected to the back of the computer. In addition, when checking the connection of the network cable, ensure that the LEDs on the network are properly illuminated. For example, a network card with a solid green LED or light usually indicates that the card is either connected or receiving a signal. Note: generally, when the green light is flashing, this is an indication of data being sent or received.

If, however, the card does not have any lights or has orange or red lights, it is possible that either the card is bad, the card is not connected properly, or that the card is not receiving a signal from the network.

If you are on a small or local network and have the capability of checking a hub or switch, verify that the cables are properly connected and that the hub or switch has power.

Adapter resources

Ensure that if this is a new network card being installed into the computer that the card’s resources are properly set and/or are not conflicting with any hardware in the computer.

Users who are using Windows 95, 98, ME, 2000 or XP, verify that Device Manager has no conflicts or errors. Additional help and information about Device Manager and resources can be found on our Device Manager page.

Adapter functionality

Verify that the network card is capable of pinging or seeing itself by using the ping command. Windows / MS-DOS users ping the computer from a MS-DOS prompt. Unix / Linux variant users ping the computer from the shell.

To ping the card or the localhost, type either

ping 127.0.0.1

or

ping localhost

This should show a listing of replies from the network card. If you receive an error or if the transmission failed, it is likely that either the network card is not physically installed into the computer correctly, or that the card is bad.

Protocol

Verify that the correct protocols are installed on the computer. Most networks today will utilize TCP/IP, but may also utilize or require IPX/SPX and NetBEUI.

Additional information and help with installing and reinstalling a network protocol can be found on document CH000470.

When the TCP/IP protocol is installed, unless a DNS server or other computer assigns the IPX address, the user must specify an IP address as well as a Subnet Mask. To do this, follow the below instructions.

1.

Click Start / Settings / Control Panel
2.

Double-click the Network icon
3.

Within the configuration tab double-click the TCP/IP protocol icon. Note: Do not click on the PPP or Dial-Up adapter, click on the network card adapter.
4.

In the TCP/IP properties click the IP address tab
5.

Select the option to specify an IP address
6.

Enter the IP address and Subnet Mask address, an example of such an address could be:

IP Address: 102.55.92.1
Subnet Mask: 255.255.255.192

7.

When specifying these values, the computers on the network must all have the same Subnet Mask and have a different IP Address. For example, when using the above values on one computer you would want to use an IP address of 102.55.92.2 on another computer and then specify the same Subnet Mask.

Firewall

If your computer network utilizes a firewall, ensure that all ports required are open. If possible, close the firewall software program or disconnect the computer from the firewall to ensure it is not causing the problem.

Additional time

In some cases it may take a computer some additional time to detect or see the network. If after booting the computer you are unable to see the network, give the computer 2-3 minutes to detect the network. Windows users may also want to try pressing the F5 (refresh) key when in Network Neighborhood to refresh the network connections and possibly detect the network.

Additional troubleshooting

If after following or verifying the above recommendations you are still unable to connect or see the network, attempt one or more of the below recommendations.

If you have installed or are using TCP/IP as your protocol you can attempt to ping another computer’s IP address to verify if the computer is able to send and receive data. To do this, Windows or MS-DOS users must be at a prompt and Linux / Unix variant users must open or be at a shell.

Once at the prompt assuming, that the address of the computer you wish to attempt to ping is 102.55.92.2, you would type:

ping 102.55.92.2

If you receive a response back from this address (and it is a different computer), this demonstrates that the computer is communicating over the network. If you are still unable to connect or see the network, it is possible that other issues may be present.

Another method of determining network issues is to use the tracert command if you are a MS-DOS or Windows user or the traceroute command if you are a Linux / Unix variant user. To use this command you must be at the command prompt or shell.

Once at the prompt, assuming that the address is again 102.55.92.2, type:

tracert 102.55.92.2

or

traceroute 102.55.92.2

This should begin listing the hops between the computer and network devices. When the connection fails, determine which device is causing the issue by reviewing the traceroute listing.

RAJ SOLUTION'S

PROMISSING NOTE:-

All This Stuff is For u only..
But u all only If dont comments then its Better we should stop Blogging....