
These techniques to recover a lost xp password are among the more advanced Windows XP Tips and Tricks. In some cases, recovering from a lost password can be very easy though. or completeness' sake we start with the simplest tips that can help you regain access to a locked account. But even if you find yourself in a more complex situation, please read on. You'll find out what to do
Warning : Be extra careful if you are using Encrypting File System (EFS) in Windows XP Professional. If you don't know what EFS is, you probably shouldn't worry about it. It's a feature in Windows XP Professional that deals with file security on a local level. If you do use it, please always make sure to export your private and public keys before attempting to reset your password.
Wednesday, December 3, 2008
Tuesday, November 25, 2008
Safely editing registry
Windows XP has a vast number of configuration dialogs, but some adjustments can be performed only by directly editing the Registry. Frequently, tips involving Registry tweaks include stern warnings to back up the Registry before making any change. The Windows XP Backup applet can back up the Registry along with other elements of the System State, but the resulting data file can occupy hundreds of megabytes. You're better off saving a system restore point each time you're about to edit the Registry. Better still, you can use Regedit to back up only the Registry keys that will be changed.
Click on Start | Run and enter Regedit to launch the Registry editor. To back up an individual key you plan to edit, navigate to the key and right-click on it. Choose Export from the menu, and save the key to a REG file. Open the REG file in Notepad and insert a few comment lines that describe the source and purpose of the tweak. (To create a comment line, simply put a semicolon at the start of the line.
Now go ahead and make all the changes to Registry keys and values specified by the tip you're applying. Any time you add a new key or value, make a note of it with another comment line in the REG file. When you're done, save the REG file and close Notepad.
If later you want to undo this Registry tweak, just double-click on the REG file and confirm that you want to add it to the Registry. This will restore any deleted keys or values and will restore the original data for any values whose data was changed. Note that this will not remove new keys or values that were added; that's why you need to make comments about such changes.
Right-click on the REG file and choose Edit, which will open it in Notepad. Check for comments about keys or values that were added, and if you find any, use Regedit to delete them. You can delete the REG file itself once you've completed this process
New vista shortcuts
Known thing![]() +d. Which display's the desktop.
+d. Which display's the desktop.
![]() +e is for Explorer and Windows Key
+e is for Explorer and Windows Key
![]() +r launches the Run dialog box.
+r launches the Run dialog box.
![]() +L is switch user or user exit
+L is switch user or user exit
New Vista Shortcuts
![]() +u activates the Ease of Use Center. (Used for turning ON/OFF Narrator or Magnify).
+u activates the Ease of Use Center. (Used for turning ON/OFF Narrator or Magnify).
![]() +t cycles through programs in Taskbar
+t cycles through programs in Taskbar
![]() +Tab activates the new Vista feature called Flip 3-D.New keyboards r having a special key dedicated to this Flip 3-D.This feature is addition to Alt +Tab.
+Tab activates the new Vista feature called Flip 3-D.New keyboards r having a special key dedicated to this Flip 3-D.This feature is addition to Alt +Tab.
![]() +g switches b/w Gadgets.
+g switches b/w Gadgets.
![]() +spacebar brings Gadgets to front.
+spacebar brings Gadgets to front.
![]() +x cycles thought the Mobility Center.
+x cycles thought the Mobility Center.
![]() +a All Programs
+a All Programs![]() F8 to Shutdown computer
F8 to Shutdown computer![]() F6 to Restart computer
F6 to Restart computer![]() F4 to Log Off
F4 to Log Off
![]() +d Desktop
+d Desktop
![]() +e Explorer
+e Explorer![]() +f Search (Find)
+f Search (Find)![]() +g Gadgets
+g Gadgets![]() +l Lock workstation
+l Lock workstation![]() +m Minimise
+m Minimise![]() +r Run Command (Try with '\' backspace)
+r Run Command (Try with '\' backspace)![]() +t Quick Launch (Taskbar)
+t Quick Launch (Taskbar)![]() +u Ease of Access Center
+u Ease of Access Center![]() +x Mobility Center
+x Mobility Center![]() +Tab Flip 3-d feature
+Tab Flip 3-d feature![]() +Pause / Break key System Tabs
+Pause / Break key System Tabs
List of MS-DOS commands for hacking and its defence
ADDUSERS Helps Add or list users to/from a CSV file
ARP Address Resolution Protocol
ASSOC Change file extension associations
ASSOCIAT One step file association
AT Schedule a command to run at a later time
ATTRIB Change file attributes
BOOTCFG Edit Windows boot settings
BROWSTAT Get domain, browser and PDC info
CACLS Change file permissions
CALL Call one batch program from another
CD Change Directory - move to a specific Folder
CHANGE Change Terminal Server Session properties
CHKDSK Check Disk - check and repair disk problems
CHKNTFS Check the NTFS file system
CHOICE Accept keyboard input to a batch file
CIPHER Encrypt or Decrypt files/folders *
CleanMgr Automated cleanup of Temp files, recycle bin
CLEARMEM Clear memory leaks
CLIP Copy STDIN to the Windows clipboard.
CLS Clear the screen
CLUSTER Windows Clustering
CMD Start a new CMD shell
COLOR Change colors of the CMD window
COMP Compare the contents of two files or sets of files
COMPACT Compress files or folders on an NTFS partition
COMPRESS Compress individual files on an NTFS partition
CON2PRT Connect or disconnect a Printer
CONVERT Convert a FAT drive to NTFS.
COPY Copy one or more files to another location
CSVDE Import or Export Active Directory data
DATE Display or set the date
Dcomcnfg DCOM Configuration Utility
DEFRAG Defragment hard drive
DEL Delete one or more files
DELPROF Delete NT user profiles
DELTREE Delete a folder and all subfolders
DevCon Device Manager Command Line Utility
DIR Display a list of files and folders
DIRUSE Display disk usage
DISKCOMP Compare the contents of two floppy disks
DISKCOPY Copy the contents of one floppy disk to another
DNSSTAT DNS Statistics
DOSKEY Edit command line, recall commands, and create macros
DSADD Add user (computer, group..) to active directory
DSQUERY List items in active directory
DSMOD Modify user (computer, group..) in active directory
ECHO Display message on screen
ENDLOCAL End localisation of environment changes in a batch file
ERASE Delete one or more files
EXIT Quit the CMD shell
EXPAND Uncompress files
EXTRACT Uncompress CAB files
FC Compare two files
FDISK Disk Format and partition
FIND Search for a text string in a file
FINDSTR Search for strings in files
FOR Loop command: all options Files, Directory, List
FORFILES Batch process multiple files
FORMAT Format a disk
FREEDISK Check free disk space (in bytes)
FSUTIL File and Volume utilities
FTP File Transfer Protocol
FTYPE Display or modify file types used in file extension associations
GLOBAL Display membership of global groups
GOTO Direct a batch program to jump to a labelled line
HELP Online Help
HFNETCHK Network Security Hotfix Checker
IF Conditionally perform a command
IFMEMBER Is the current user in an NT Workgroup
IPCONFIG Configure IP
KILL Remove a program from memory
LABEL Edit a disk label
LOCAL Display membership of local groups
LOGEVENT Write text to the NT event viewer.
LOGOFF Log a user off
LOGTIME Log the date and time in a file
MEM Display memory usage
MD Create new folders
MODE Configure a system device
MORE Display output, one screen at a time
MOUNTVOL Manage a volume mount point
MOVE Move files from one folder to another
MOVEUSER Move a user from one domain to another
MSG Send a message
MSIEXEC Microsoft Windows Installer
MSINFO Windows NT diagnostics
MSTSC Terminal Server Connection (Remote Desktop Protocol)
MUNGE Find and Replace text within file(s)
MV Copy in-use files
NET Manage network resources
NETDOM Domain Manager
NETSH Configure network protocols
NETSVC Command-line Service Controller
NBTSTAT Display networking statistics (NetBIOS over TCP/IP)
NETSTAT Display networking statistics (TCP/IP)
NOW Display the current Date and Time
NSLOOKUP Name server lookup
NTBACKUP Backup folders to tape
NTRIGHTS Edit user account rights
PATH Display or set a search path for executable files
PATHPING Trace route plus network latency and packet loss
PAUSE Suspend processing of a batch file and display a message
PERMS Show permissions for a user
PERFMON Performance Monitor
PING Test a network connection
POPD Restore the previous value of the current directory saved by PUSHD
PORTQRY Display the status of ports and services
PRINT Print a text file
PRNCNFG Display, configure or rename a printer
PRNMNGR Add, delete, list printers set the default printer
PROMPT Change the command prompt
PsExec Execute process remotely
PsFile Show files opened remotely
PsGetSid Display the SID of a computer or a user
PsInfo List information about a system
PsKill Kill processes by name or process ID
PsList List detailed information about processes
PsLoggedOn Who’s logged on (locally or via resource sharing)
PsLogList Event log records
PsPasswd Change account password
PsService View and control services
PsShutdown Shutdown or reboot a computer
PsSuspend Suspend processes
PUSHD Save and then change the current directory
QGREP Search file(s) for lines that match a given pattern.
RASDIAL Manage RAS connections
RASPHONE Manage RAS connections
RECOVER Recover a damaged file from a defective disk.
REG Read, Set or Delete registry keys and values
REGEDIT Import or export registry settings
REGSVR32 Register or unregister a DLL
REGINI Change Registry Permissions
REM Record comments (remarks) in a batch file
REN Rename a file or files.
REPLACE Replace or update one file with another
RD Delete folder(s)
RDISK Create a Recovery Disk
RMTSHARE Share a folder or a printer
ROBOCOPY Robust File and Folder Copy
ROUTE Manipulate network routing tables
RUNAS Execute a program under a different user account
RUNDLL32 Run a DLL command (add/remove print connections)
SC Service Control
SCHTASKS Create or Edit Scheduled Tasks
SCLIST Display NT Services
ScriptIt Control GUI applications
SET Display, set, or remove environment variables
SETLOCAL Control the visibility of environment variables
SETX Set environment variables permanently
SHARE List or edit a file share or print share
SHIFT Shift the position of replaceable parameters in a batch file
SHORTCUT Create a windows shortcut (.LNK file)
SHOWGRPS List the NT Workgroups a user has joined
SHOWMBRS List the Users who are members of a Workgroup
SHUTDOWN Shutdown the computer
SLEEP Wait for x seconds
SOON Schedule a command to run in the near future
SORT Sort input
START Start a separate window to run a specified program or command
SU Switch User
SUBINACL Edit file and folder Permissions, Ownership and Domain
SUBST Associate a path with a drive letter
SYSTEMINFO List system configuration
TASKLIST List running applications and services
TIME Display or set the system time
TIMEOUT Delay processing of a batch file
TITLE Set the window title for a CMD.EXE session
TOUCH Change file timestamps
TRACERT Trace route to a remote host
TREE Graphical display of folder structure
TYPE Display the contents of a text file
USRSTAT List domain usernames and last login
VER Display version information
VERIFY Verify that files have been saved
VOL Display a disk label
WHERE Locate and display files in a directory tree
WHOAMI Output the current UserName and domain
WINDIFF Compare the contents of two files or sets of files
WINMSD Windows system diagnostics
WINMSDP Windows system diagnostics II
WMIC WMI Commands
XCACLS Change file permissions
XCOPY Copy files and folders
This list is not exhaustive . Most commands will work well, however please don’t fume up as some of these might not work on your machine due to version dependencies
Saturday, August 23, 2008
BOOST YOUR MOZILLA FIREFOX SPEED
BOOST YOUR MOZILLA FIREFOX SPEED
Type about:config in the address bar, Then look for the following entries, and make the corresponding changes.
1.
network.http.max-connections-per-server =32
2.
network.http.max-persistent-connections-per-proxy =16
3.
network.http.max-connections = 64
4.
network.http.max-persistent-connections-per-server = 10
5.
network.http.pipelining = true
6.
network.http.pipelining.maxrequests = 200
7.
network.http.request.max-start-delay = 0
8.
network.http.proxy.pipelining = true
9.
network.http.proxy.version = 1.0
Top 10 Tips for Linux Users
Top 10 Tips for Linux Users
Everyone develops their favorite tips and tricks for using Linux based on their own experience and the kind of work they are doing. Here are some of mine freind has given to me (actually I am not much familier with LINUX , so one of my friend from US has sent me the article on LINUX) . These tips may seem simple, but I've found it's often the simple tricks that are the most useful in day-to-day work.
1. Switch to another console. Linux lets you use "virtual consoles" to log on to multiple sessions simultaneously, so you can do more than one operation or log on as another user. Logging on to another virtual console is like sitting down and logging in at a different physical terminal, except you are actually at one terminal, switching between login sessions.
Virtual consoles are especially useful if you aren't running X, but you can use them even if you are.
In early versions of the kernel (pre-1.1.54), the number of available virtual consoles was compiled into the kernel. With more recent kernels, 63 virtual consoles are available, with 6 set up by default in the file /etc/inittab.
Use the key combination Alt+Fn to switch between virtual consoles, where Fn is one of the function keys F1-F6. (If you are in X, you'll probably need to use Ctrl-Alt-Fn instead.) Alt+F7 gets you back to your X session, if one is running. You can rotate between consoles with the Alt-right arrow and Alt-left arrow key combinations.
2. Temporarily use a different shell. Every user account has a shell associated with it. The default Linux shell is bash; a popular alternative is tcsh. The last field of the password table (/etc/passwd) entry for an account contains the login shell information. You can get the information by checking the password table, or you can use the finger command. For example, the command "finger ellen" shows, among other things, that I use /bin/tcsh.
Related Reading
Linux in a Nutshell
Linux in a Nutshell
By Ellen Siever, Stephen Spainhour, Jessica P. Hekman, Stephen Figgins
Table of Contents
Index
Sample Chapter
Read Online--Safari Search this book on Safari:
Code Fragments only
The command chsh changes the login shell for all future logins; that is, it changes the account entry in the password table to reflect the new shell. However, you can also temporarily use another shell at any time by simply running the new shell. For example, if I want to try something out in bash, I can type "bash" at the prompt and be put into a bash shell. Typing either Ctrl-d or exit gets rid of that shell and returns me to my tcsh session.
3. Print a man page. Here are a few useful tips for viewing or printing manpages:
To print a manpage, run the command:
man | col -b | lpr
The col -b command removes any backspace or other characters that would make the printed manpage difficult to read.
Also, if you want to print a manpage that isn't in a standard man directory (i.e., it's in a directory that isn't specified in the MANPATH environment variable), you can specify the full pathname of the manpage, including the full filename:
man /work/myapp/mymanpage.1
If you use the Emacs editor, you can view a manpage with the command Meta-x man; Emacs then prompts you for the name of the manpage. You can view the page or print it as you would any other Emacs buffer.
As a last resort, you can format the manpage directly with the groff command. However, the default output is a PostScript file, so you'll want to either send it to a PostScript printer or to a viewer such as ghostview:
groff -man /work/myapp/mymanpage.1 | ghostview -i
You can get ASCII output with the -a option, but the result is unformatted text. Not pretty to read, but it might suffice if nothing else works.
4. Use command substitution to simplify complex operations. Command substitution lets you use the output of one command as an input argument to another command. To use command substitution, determine what command will generate the output you want, put that command in backquotes, and use it as an argument to another command. For example, I often use command substitution to recursively grep the files in a directory tree:
grep 'Title' `find /work -type f -name 'chap*' -print` > chaptitles
The portion of this command in backquotes is a find command that builds a list of chapter files in the /work directory. That list is then used to provide the set of input files for grep to search for titles. The output is saved in a file called chaptitles.
5. Look inside a non-text file. Sometimes you really want to see inside a binary file. Maybe there isn't a manpage and you're looking for usage information, or perhaps you're looking for information about who wrote a program or what application a file is associated with.
The strings command is perfect for that purpose--it searches through a file looking for sequences of printable character strings and writes them to standard output. You can pipe the output through a pager like more, or if you are looking for particular text, you can pipe the output to the grep command.
6. Use the locate command. Looking for an easier way to find files than the find command? Try using locate. In contrast to find's complexity, locate is the ultimate in simplicity. The command:
locate
searches an internal database and prints the pathnames of all files and directories that contain the given string in their names. You can narrow down the search by piping the output to grep. For example, the following finds all files containing the string "kde" that are in bin directories:
locate kde | grep bin
The strings don't have to be complete names; they can be partial strings, such as "gno" instead of spelling out "gnome". The -r option lets you use a regular expression (in quotes):
locate -r 'gno*'
One thing to be aware of is that locate is case-sensitive: Searching for HOWTO and for howto will give you different results.
Rather than searching the disk each time, as find does, locate depends on the creation and maintenance of a database. Because it only has to search the database, not the disk, locate is faster than find. On the other hand, the results are only as current as the database.
The locate database is generally updated daily by a cron job, but you can update it manually by running the command updatedb (usually as root). If you are adding new applications or deleting old files and you don't want to wait for the next day to have an up-to-date database, you might want to run it manually.
7. Use dmesg to view startup messages. The dmesg command provides an easier way to see the boot messages than trying to read them before they scroll off the screen. When Linux boots, the kernel startup messages are captured in a buffer known as the kernel ring buffer; dmesg prints the contents of that buffer. By default, dmesg prints its output to the screen; you can of course redirect the output to a file:
% dmesg > bootmsg
8. Find out what kernel version you are using. Do you ever need to know what version of the Linux kernel is running on your system? You can find out with the uname command, which prints information about the system. Issued with the -r option, uname prints the kernel version:
% uname -r
2.2.14-5.0
Other uname options provide information such as the machine type, the name of the operating system, and the processor. The --all option prints all the available information.
9. Use df and du to maintain your disk. Use the df (display filesystem) command to keep an eye on how much space each of your filesystems occupies and how much room is left. It's almost inevitable that if you like to download new software and try it out, you'll eventually fill up your disk. df has some options, but running it without options provides the basic information--the column labeled Use% tells you how full each filesystem is:
% df Filesystem 1k-blocks Used Available Use% Mounted on /dev/hda3 1967156 1797786 67688 96% /
Oops, time to clean house... and that's where du (disk usage) comes in handy. The du command provides the information you need to find the big space users, by printing the amount of disk space used for each file, subdirectory, and directory. You can specify the directory du is to start in, or let it default to the current directory.
If you don't want to run du recursively through subdirectories, use the -s option to summarize. In that case, you need to specify all the directories you are interested in on the command line. For example:
% du -s /usr/X11R6
142264 /usr/X11R6
% du -s /usr/X11R6/*
34490 /usr/X11R6/bin
1 /usr/X11R6/doc
3354 /usr/X11R6/include
97092 /usr/X11R6/lib
7220 /usr/X11R6/man
106 /usr/X11R6/share
With the information provided by du, you can start in the directories that occupy the most disk space and delete or archive files you no longer actively use.
10. Permit non-root users to mount or unmount drives. While hard drives are normally mounted automatically when the system is booted, other drives such as the floppy drive and the CD-ROM are generally not mounted until they are going to be used, so that disks can be inserted and removed. By default, root privileges are required for doing the mount (or unmount). However, you can modify the entries in the filesystem table, /etc/fstab, to let other users run the mount command. Do this by adding the option "user" to the appropriate entry:
/dev/fd0 /mnt/floppy auto noauto,user 0 0 /dev/cdrom /mnt/cdrom iso9660 noauto,ro,user,unhide 0 0
You can see what filesystems are currently mounted, and what options they were mounted with, by looking at the file /etc/mtab or by running the mount command with no options or arguments.
INCREASE BROADBAND SPEED UPTO 20%
INCREASE BROADBAND SPEED UPTO 20%
If you are using a BroadBand connection at your home and using Windows Xp as your Operating System, and you feel that your BB speed is a bit less, then in that case you have the option to increase your Broadband speed upto 20%.
HOW? Well this is what you need to do.
1. First of all make sure you are logged in as Administrator.
2. Go to Start -> Run -> gpedit.msc, press OK.
3. Then go to Computer Configuration -> Administrative Templates -> Network -> QoS packet Scheduler.
4. On the right it will give you the option of “Limit Reservable bandwidth”, open and and select “Enabled”, and change the value to 0.
Hack Admin Password From User Mode
Hack Admin Password From User Mode
Follow these steps:
1. Open command prompt (Start->Run->cmd),
2. Enter the followin command, then press ENTER:
compmgmt.msc
3.This should open the computer management console.
4. Go to local users & groups->users. Right click on any user and select "set password".
If you get a "access denied" do the following:
start>run>cmd
then use following commands
1) net user test /add (this command will make test named user)
2) net localgroup administrators test /add (this command will make test user as administrators rights)
and use net user command to reset your admin. password
Improve Hard Disk Speed
Improve Hard Disk Speed
If hard disk of your computer or server is taking too much time to get the result, then to improve your hard disk speed you will need to configure a special buffer in the computer’s memory in order to enable it to better deal with interrupts made from the disk. This tip is only recommended if your computer or server has 256MB RAM or higher.
Step 1:
Run SYSEDIT.EXE from the Run command.
Step 2:
Expand the system.ini file window.
Step 3:
Scroll down almost to the end of the file till you find a line called [386enh].
Step 4:
Press Enter to make one blank line, and in that line type
Irq14=4096
Note: This line IS CASE SENSITIVE!!!
Step 5:Click on the File menu, then choose Save.
Step 6:
Close SYSEDIT and reboot your computer or server.
Done.
Speed improvement will be noticed after the computer reboots.
INCREASE DOWNLOAD SPEED OF UTORRENT
INCREASE DOWNLOAD SPEED OF UTORRENT
uTorrent was very slow for me until recently I applied a few tweaks. Here’s what I did.
Note: Some of the settings mentioned below are optimized for 256k connection. If you want to calculate the optimal settings for your connection, check at the end of this tutorial. But I suggest you to read the entire tutorial for guidance on other settings.
First go to Options>Preferences>Network
1. Under ‘Port used for incomming connections’, enter any port number. It is best to use a port number above 10000. I use 45682.
2. Randomize port each time utorrent starts: UNCHECKED. I leave this unchecked because I have a router. If you do not have a router or a firewall, and want extra security,check this option.
3. Enable UPnP port mapping (Windows Xp or later only): UNCHECKED. I leave this unchecked because I have experienced it slowing down speeds. It is not needed if you manually port forward.
4. Add utorrent to Windows Firewall exceptions (Windows XP SP2 or later only): UNCHECKED (do this only if you have windows firewall disabled)
5. Global Maximum upload rate (kb/s): [0: unlimited]: 22 (for 256k connection)
6. Protocol Encryption: ENABLED. I would recommend everyone to enable this. This can help increase speeds with many ISPs.
7. Allow incoming Legacy Connections: CHECKED
Network Settings
Options>Preferences>Torrents
1. Global Maximum Number of Connections: 130 (for 256k connection)This number should not be set too low or the number of connections made to your torrents will be limited. Setting it too high may cause too much bandwidth to be used and can cause slowdowns.
2. Maximum Number of connected peers per torrent: 70 (for 256k connection)If you see that the peers connected to a specific torrent are exactly this number, or very close, increase this number to improve speeds.
3. Number of upload slots per torrent: 3 (for 256k connection)This depends on how much you want to upload to other users. Do not set too low or it may affect download speeds.
4. Use additional upload slots if upload speed <90%: CHECKED
5. Maximum number of active torrents: 2 (for 256k connection)
6. Maximum number of active downloads: 1 (for 256k connection)
7. Enable DHT Network: CHECKEDThis is recommended to be checked to improve speeds. More people will be available for sharing if this is checked.
8. Enable DHT for new torrents: CHECKED
9. Enable Peer Exchange: CHECKED
10. Enable scrapping: CHECKED
11. Pre-allocate all files: CHECKED
12. Append .!ut to incomplete files: UNCHECKED
Torrent Settings
Options>Preferences>Advanced
net.max_halfopen: 50
If you use Windows XP SP2, patch tcpip.sys with LvlLord’s Event ID 4226 Patcher to get better performance.
DO NOT CHANGE THIS OPTION unless you have Windows XP SP2 and have patched tcpip.sys.
You can also patch tcpip.sys with xp-Antispy
If you have a firewall
* Open up the options/preferences/settings for the firewall - usually your firewall will have an icon to click in the taskbar
* Look for the keywords “allow list” or “programs”
* Add the application you want to give access to the internet
* Make sure to save your settings when you are done
If you have a router
1. Go to start>run>type cmd, press enter>type ipconfig, press enter
2. Remember both your ip address and your default gateway
3. Type in your default gateway into your default browser, a password prompt may come up. The default username and password are admin for my router
4. Under ‘Applications’ fill out one line for each p2p client you use
5. You need to use your ip address, the correct port range and set either tcp or udp
6. You can find and change the ports in the actual p2p client’s settings, just make sure they are the same in the router
7. Most p2p apps need both tcp and udp checked, if you are not sure check your p2p client’s FAQ
8. Save your settings
:!: Check PortForward.com to forward ports for uTorrent.
Some of the settings I mentioned above are relative to my bandwidth.
How to calculate optimal settings for your connection
In order to apply the following tips you need to know your maximum upload and download speeds. You can test your bandwidth over here.
Maximum upload speed
If you use your Maximum upload speed, there won’t be not enough space left for the files you are downloading. So you have to cap your upload speed.
This is how I calculate my optimal upload speed…
upload speed * 80%
Maximum download speed
Setting your maximum download speed to unlimited will hurt your connection. So use this to calculate your optimal setting.
download speed * 90%
Maximum connected peers per torrent
upload speed * 1.3
Maximum upload slots
1 + (upload speed / 6)
Disable Windows Firewall
Windows Firewall hates P2P and so disable it and get yourself a decent firewall like Zone Alarm.
And last optimize your Internet connection with TCP Optimizer.
Know any other tricks to increase uTorrent’s download speed? Please share them here.
Wednesday, July 16, 2008
Internet Domain Name System Structure and Delegation
Internet Domain Name System Structure and Delegation
Abstract
This document is a summary of current practices of the Internet Assigned Numbers Authority (IANA) in administering RFC 1591, which includes the guidance contained in ccTLD News Memo #1 dated October 23, 1997. It DOES NOT reflect any changes in policy affecting the administration of DNS delegations. It is intended to serve as the basis for possible future discussions of policy in this area. Changes in ICANN/IANA policy will be made following public notice and comment in accordance with the ICANN Bylaws.
Introduction
The IANA is the overall authority for day-to-day administration of the Internet Domain Name System (DNS). IANA staff carry out administrative responsibilities for the assignment of IP Addresses, Autonomous System Numbers, Top Level Domains (TLDs), and other unique parameters of the DNS and its protocols. This document provides general information on IANA policy for administering the DNS. Instructions on procedures to be followed in requesting TLD delegations or changes are available on the website at iana.org.
Top Level Structure of the DNS
The DNS structure contains a hierarchy of names. The root, or highest level, of the system is unnamed. Top Level Domains (TLDs) are divided into classes based on rules that have evolved over time. Most TLDs have been delegated to individual country managers, whose codes are assigned from a table known as ISO-3166-1, which is maintained by an agency of the United Nations. These are called country-code Top Level Domains, or ccTLDs. In addition, there are a limited number of "generic" Top Level Domains (gTLDs), which do not have a geographic or country designation. Responsibility for adoption of procedures and policies for the assignment of Second Level Domain Names (SLDs), and lower level hierarchies of names, has been delegated to TLD managers, subject to the policy guidance contained in this document. Country code domains are each organized by a manager for that country. These managers are performing a public service on behalf of the Internet community. A list of current TLD assignments and names of the delegated managers can be accessed at http://www.iana.org/cctld/cctld.htm.
The Management of Delegated Domains
As part of its responsibility for the overall coordination and management of the DNS, the IANA receives and processes all requests for new TLDs and for changes to existing TLDs. The following policies are applicable to management of TLDs. In general, the principles described here apply recursively to all delegations of the Internet DNS name space.
(a) Delegation of a New Top Level Domain. Delegation of a new top level domain requires the completion of a number of procedures, including the identification of a TLD manager with the requisite skills and authority to operate the TLD appropriately. The desires of the government of a country with regard to delegation of a ccTLD are taken very seriously. The IANA will make them a major consideration in any TLD delegation/transfer discussions. Significantly interested parties in the domain should agree that the proposed TLD manager is the appropriate party. The key requirement is that for each domain there be a designated manager for supervising that domain's name space. In the case of ccTLDs, this means that there is a manager that supervises the domain names and operates the domain name system in that country. There must be Internet Protocol (IP) connectivity to the nameservers and electronic mail connectivity to the entire management, staff, and contacts of the manager. There must be an administrative contact and a technical contact for each domain. The administrative contact must reside in the country involved for ccTLDs. The IANA may choose to make partial delegations of a TLD when circumstances, such as those in a developing country, so dictate. It may also authorize a "proxy" DNS service outside of a developing country as a temporary form of assistance to the creation of Internet connectivity in new areas. [N.B. The IANA continues to receive inquiries about delegation of new gTLDs. This is a significant policy issue on which ICANN will conduct a careful study and review based on the established decision making procedures. Information about this study will be disseminated on the website at icann.org.]
(b) TLD Manager Responsibility. TLD managers are trustees for the delegated domain, and have a duty to serve the community. The designated manager is the trustee of the TLD for both the nation, in the case of ccTLDs, and the global Internet community. Concerns about "rights" and "ownership" of domains are inappropriate. It is appropriate, however, to be concerned about "responsibilities" and "service" to the community.
(c) Fair Treatment. The designated manager must be equitable and fair to all groups in the domain that request domain names. Specifically, the same rules must be applied to all requests and they must be processed in a non-discriminatory fashion. The policies and procedures for the use of each TLD must be available for public inspection. Generally these are posted on web pages or made available for file transfer. While variations in policies and procedures from country to country are expected due to local customs and cultural values, they must be documented and available to interested parties. Requests from for-profit and non-profit companies and organizations are to be treated on an equal basis. No bias shall be shown regarding requests that may come from customers of some other business related to the TLD manager. For example, no preferential service for customers of a particular data network provider. There can be no stipulation that a particular application, protocol, or product be used.
(d) Operational Capability. The TLD manager must do a satisfactory job of operating the DNS service for the domain. Duties such as the assignment of domain names, delegation of subdomains and operation of nameservers must be done with technical competence. This includes keeping the IANA or other higher-level domain manager advised of the status of the domain, responding to requests in a timely manner, and operating the database with accuracy, robustness, and resilience. Because of its responsibilities for the DNS, the IANA must be granted access to all TLD zones on a continuing basis. There must be a primary and a secondary nameserver that have IP connectivity to the Internet and can be easily checked via access to zones for operational status and database accuracy by the IANA.
(e) Transfers and Disputes over Delegations. For transfer of TLD management from one organization to another, the higher-level domain manager (the IANA in the case of TLDs), must receive communications from both the old organization and the new organization that assure the IANA that the transfer is mutually agreed, and that the proposed new manager understands its responsibilities. It is also very helpful for the IANA to receive communications from other parties that may be concerned or affected by the transfer. In the event of a conflict over designation of a TLD manager, the IANA tries to have conflicting parties reach agreement among themselves and generally takes no action unless all contending parties agree. On a few occasions, the parties involved in proposed delegations or transfers have not been able to reach an agreement and the IANA has been required to resolve the matter. This is usually a long drawn out process, leaving at least one party unhappy, so it is far better when the parties can reach an agreement among themselves. It is appropriate for interested parties to have a voice in the selection of the designated manager.
(f) Revocation of TLD Delegation. In cases where there is misconduct, or violation of the policies set forth in this document and RFC 1591, or persistent, recurring problems with the proper operation of a domain, the IANA reserves the right to revoke and to redelegate a Top Level Domain to another manager.
(g) Subdelegations of Top Level Domains. There are no requirements for management of subdomains of TLDs, including subdelegations, beyond the requirements for TLDs stated in this document and RFC 1591. In particular, all subdomains shall be allowed to operate their own domain nameservers, providing in them whatever information the subdomain manager sees fit, as long as it is true and correct.
(h) Rights to Domain Names. The IANA has no special requirement for policies to be followed by TLD managers in connection with disputes over rights to domain names other than those stated generally in this document and RFC 1591. Please note, however, that use of a particular domain name may be subject to applicable laws, including those concerning trademarks and other types of intellectual property.
(i) Uses of ISO 3166-1 Table. The IANA is not in the business of deciding what is and what is not a country. The selection of the ISO-3166-1 list as a basis for country code top-level domain names was made with the knowledge that ISO has a procedure for determining which entities should be and should not be on that list. For more information about the ISO 3166 Maintenance Agency, please see the following webpage: http://www.iso.org/iso/en/prods-services/iso3166ma/index.html.
(j) Maintenance Procedure for Root Zone File. The primary root zone file is currently located on the A root server, which is operated by Network Solutions, Inc.(NSI), under a cooperative agreement with the U.S. Government. Changes to the root zone file are made by NSI according to procedures established under Amendment 11 of that cooperative agreement.
This file last mo
How to install and use the Recovery Console in Windows XP
How to install and use the Recovery Console in Windows XP
SUMMARY
To recover your operating system when your computer does not start correctly or does not start at all, you may want to install and use the Windows Recovery Console. to the topHowever, Microsoft recommends this method of system recovery for advanced users only. Also, learn about the Recovery Console command prompt, command actions, rules, how to remove the Recovery Console, and how to install it during an unattended installation.
INTRODUCTION
Microsoft recommends that you use the Recovery Console only after Safe mode and other startup options do not work. The Recovery Console is recommended only if you are an advanced user who can use basic commands to identify and locate problem drivers and files. Additionally, you must be an administrator to use the Recovery Console.
Back to the top
MORE INFORMATION
How to install the Recovery Console
You can install the Recovery Console on your computer to make it available if you cannot restart Windows. You can then select the Recovery Console option from the list of available operating systems during startup. Install the Recovery Console on important servers and on the workstations of IT personnel. This article describes how to install the Recovery Console to your Microsoft Windows XP-based computer. To install the Recovery Console, you must be logged on as an administrator.
Although you can run the Recovery Console by starting directly from the Windows XP CD, it is generally more convenient to set it up as a startup option on your startup menu. To run the Recover Console directly from the CD, see the "How to use the Recovery Console" section.
To install the Recovery Console, follow these steps:
1. Insert the Windows XP CD into the CD-ROM drive.
2. Click Start, and then click Run.
3. In the Open box, type d:\i386\winnt32.exe /cmdcons where d is the drive letter for the CD-ROM drive.
4. A Windows Setup Dialog Box appears. The Windows Setup Dialog Box describes the Recovery Console option. To confirm the installation, click Yes.
5. Restart the computer. The next time that you start your computer, "Microsoft Windows Recovery Console" appears on the startup menu.
Alternatively, you can use a Universal Naming Convention (UNC)-established connection to install the Recovery Console from a network share point.
Note You may receive an error message that is similar the following:
Setup cannot continue because the version of Windows on your computer is newer than the version on the CD.
If this problem occurs, click the following article number to view the article in the Microsoft Knowledge Base:
898594 (http://support.microsoft.com/kb/898594/) You receive an error message if you try to install the Recovery Console on a Microsoft Windows XP Service Pack 2-based computer
Back to the top
How to use the Recovery Console
You can enable and disable services, format drives, read and write data on a local drive (including drives that are formatted to use the NTFS file system), and perform many other administrative tasks. The Recovery Console is particularly useful if you have to repair your computer by copying a file from a disk or CD-ROM to your hard disk, or if you have to reconfigure a service that is preventing your computer from starting correctly.
If you cannot start your computer, you can run the Recovery Console from the Microsoft Windows XP startup disks or the Windows XP CD-ROM. This article describes how to perform this task.
After Windows XP is installed on your computer, to start the computer and use the Recovery Console you require the Windows XP startup disks or the Windows XP CD-ROM.
For more information about how to create Startup disks for Windows XP (they are not included with Windows XP), click the following article number to view the article in the Microsoft Knowledge Base:
310994 (http://support.microsoft.com/kb/310994/) Obtaining Windows XP Setup boot disks
Note To start the computer from the Windows XP CD-ROM, you must configure the basic input/output system (BIOS) of the computer to start from your CD-ROM drive.
To run the Recovery Console from the Windows XP startup disks or the Windows XP CD-ROM, follow these steps:
1. Insert the Windows XP startup disk into the floppy disk drive, or insert the Windows XP CD-ROM into the CD-ROM drive, and then restart the computer.
Click to select any options that are required to start the computer from the CD-ROM drive if you are prompted.
2. When the "Welcome to Setup" screen appears, press R to start the Recovery Console.
3. If you have a dual-boot or multiple-boot computer, select the installation that you must access from the Recovery Console.
4. When you are prompted, type the Administrator password. If the administrator password is blank, just press ENTER.
5. At the command prompt, type the appropriate commands to diagnose and repair your Windows XP installation.
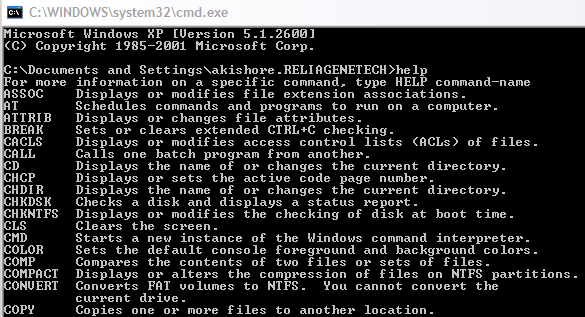
For a list of commands that are available in Recovery Console, type recovery console commands or help at the command prompt, and then press ENTER.
For information about a specific command, type help commandname at the command prompt, and then press ENTER.
6. To exit the Recovery Console and restart the computer, type exit at the command prompt, and then press ENTER.
Back to the top
How to use the Recovery Console command prompt
When you use the Recovery Console, you are working at a special command prompt instead of the ordinary Windows command prompt. The Recovery Console has its own command interpreter. To enter this command interpreter, you are prompted by Recovery Console to type the local Administrator password.
When the Recovery Console starts, you can press F6 to install a third-party SCSI or RAID driver, in case you need such a driver to access the hard disk. This prompt works the same as it does during installation of the operating system.
The Recovery Console takes several seconds to start. When the Recovery Console menu appears, a numbered list of the Windows installations on the computer appears. (Generally, only c:\Windows exists.) Press a number before you press ENTER, even when only one entry appears. If you press ENTER without selecting a number, the computer restarts and begins the process again.
When you see the prompt for %SystemRoot% (generally C:\Windows), you can start using the available commands for the Recovery Console.
Back
Command actions
The following list describes the available commands for the Recovery Console:
• Attrib changes attributes on one file or subdirectory.
• Batch executes commands that you specify in the text file, Inputfile. Outputfile holds the output of the commands. If you omit the Outputfile parameter, output appears on the screen.
• Bootcfg modifies the Boot.ini file for boot configuration and recovery.
• CD (Chdir) operates only in the system directories of the current Windows installation, removable media, the root directory of any hard disk partition, or the local installation sources.
• Chkdsk The /p switch runs Chkdsk even if the drive is not flagged as dirty. The /r switch locates bad sectors and recovers readable information. This switch implies /p. Chkdsk requires Autochk. Chkdsk automatically looks for Autochk.exe in the startup folder. If Chkdsk cannot find the file in the startup folder, it looks for the Windows 2000 Setup CD-ROM. If Chkdsk cannot find the installation CD-ROM, Chkdsk prompts the user for the location of Autochk.exe.
• Cls clears the screen.
• Copy copies one file to a target location. By default, the target cannot be removable media, and you cannot use wildcard characters. Copying a compressed file from the Windows 2000 Setup CD-ROM automatically decompresses the file.
• Del (Delete) deletes one file. Operates within the system directories of the current Windows installation, removable media, the root directory of any hard disk partition, or the local installation sources. By default, you cannot use wildcard characters.
• Dir displays a list of all files, including hidden and system files.
• Disable disables a Windows system service or driver. The variable service_or_driver is the name of the service or driver that you want to disable. When you use this command to disable a service, the command displays the service's original startup type before it changes the type to SERVICE_DISABLED. Note the original startup type so that you can use the enable command to restart the service.
• Diskpart manages partitions on hard disk volumes. The /add option creates a new partition. The /delete option deletes an existing partition. The variable device is the device name for a new partition (such as \device\harddisk0). The variable drive is the drive letter for a partition that you are deleting (for example, D). Partition is the partition-based name for a partition that you are deleting, (for example: \device\harddisk0\partition1) and can be used instead of the drive variable. The variable size is the size, in megabytes, of a new partition.
• Enable enables a Windows system service or driver. The variable service_or_driver is the name of the service or driver that you want to enable, and start_type is the startup type for an enabled service. The startup type uses one of the following formats:
SERVICE_BOOT_START
SERVICE_SYSTEM_START
SERVICE_AUTO_START
SERVICE_DEMAND_START
• Exit quits the Recovery Console, and then restarts the computer.
• Expand expands a compressed file. The variable source is the file that you want to expand. By default, you cannot use wildcard characters. The variable destination is the directory for the new file. By default, the destination cannot be removable media and cannot be read-only. You can use the attrib command to remove the read-only attribute from the destination directory. The option /f:filespec is required if the source contains more than one file. This option permits wildcard characters. The /y switch disables the overwrite confirmation prompt. The /d switch specifies that the files will not be expanded and displays a directory of the files in the source.
• Fixboot writes a new startup sector on the system partition.
• Fixmbr repairs the startup partition's master boot code. The variable device is an optional name that specifies the device that requires a new Master Boot Record. Omit this variable when the target is the startup device.
• Format formats a disk. The /q switch performs a quick format. The /fs switch specifies the file system.
• Help If you do not use the command variable to specify a command, help lists all the commands that the Recovery Console supports.
• Listsvc displays all available services and drivers on the computer.
• Logon displays detected installations of Windows and requests the local Administrator password for those installations. Use this command to move to another installation or subdirectory.
• Map displays currently active device mappings. Include the arc option to specify the use of Advanced RISC Computing (ARC) paths (the format for Boot.ini) instead of Windows device paths.
• MD (Mkdir) operates only within the system directories of the current Windows installation, removable media, the root directory of any hard disk partition, or the local installation sources.
• More/Type displays the specified text file on screen.
• Rd (Rmdir) operates only within the system directories of the current Windows installation, removable media, the root directory of any hard disk partition, or the local installation sources.
• Ren (Rename) operates only within the system directories of the current Windows installation, removable media, the root directory of any hard disk partition, or the local installation sources. You cannot specify a new drive or path as the target.
• Set displays and sets the Recovery Console environment variables.
• Systemroot sets the current directory to %SystemRoot%.
Recovery Console rules
Several environment rules are in effect while you are working in the Recovery Console. Type set to see the current environment. By default, these are the rules:
• AllowAllPaths = FALSE prevents access to directories and subdirectories outside the system installation that you selected when you entered the Recovery Console.
• AllowRemovableMedia = FALSE prevents access to removable media as a target for copied files.
• AllowWildCards = FALSE prevents wildcard support for commands such as copy and del.
• NoCopyPrompt = FALSE means that you are prompted by the Recovery Console for confirmation when overwriting an existing file.
How to delete the Recovery Console
To delete the Recovery Console:
1. Restart your computer, click Start, click My Computer, and then double-click the hard disk where you installed the Recovery Console.
2. On the Tools menu, click Folder Options, and then click the View tab.
3. Click Show hidden files and folders, click to clear the Hide protected operating system files check box, and then click OK.
4. At the root folder, delete the Cmdcons folder and the Cmldr file.
5. At the root folder, right-click the Boot.ini file, and then click Properties.
6. Click to clear the Read-only check box, and then click OK.
Warning: Modifying the Boot.ini file incorrectly may prevent your computer from restarting. Make sure that you delete only the entry for the Recovery Console. Also, change the attribute for the Boot.ini file back to a read-only state after you finish this procedure. Open the Boot.ini file in Microsoft Windows Notepad, and remove the entry for the Recovery Console. It looks similar to this:
C:\cmdcons\bootsect.dat="Microsoft Windows Recovery Console" /cmdcons
7. Save the file and close it.
How to install Recovery Console during an unattended installation
To install the Recovery Console during the unattended installation of Windows, you must use the [GuiRunOnce] section of the unattend.txt file.
Command1="path\winnt32 /cmdcons /unattend"
For more information about how to use the Unattend.txt file, see the Deployment Planning Guide of the Windows 2000 Server Resource Kit.
SUMMARY
To recover your operating system when your computer does not start correctly or does not start at all, you may want to install and use the Windows Recovery Console. to the topHowever, Microsoft recommends this method of system recovery for advanced users only. Also, learn about the Recovery Console command prompt, command actions, rules, how to remove the Recovery Console, and how to install it during an unattended installation.
INTRODUCTION
Microsoft recommends that you use the Recovery Console only after Safe mode and other startup options do not work. The Recovery Console is recommended only if you are an advanced user who can use basic commands to identify and locate problem drivers and files. Additionally, you must be an administrator to use the Recovery Console.
Back to the top
MORE INFORMATION
How to install the Recovery Console
You can install the Recovery Console on your computer to make it available if you cannot restart Windows. You can then select the Recovery Console option from the list of available operating systems during startup. Install the Recovery Console on important servers and on the workstations of IT personnel. This article describes how to install the Recovery Console to your Microsoft Windows XP-based computer. To install the Recovery Console, you must be logged on as an administrator.
Although you can run the Recovery Console by starting directly from the Windows XP CD, it is generally more convenient to set it up as a startup option on your startup menu. To run the Recover Console directly from the CD, see the "How to use the Recovery Console" section.
To install the Recovery Console, follow these steps:
1. Insert the Windows XP CD into the CD-ROM drive.
2. Click Start, and then click Run.
3. In the Open box, type d:\i386\winnt32.exe /cmdcons where d is the drive letter for the CD-ROM drive.
4. A Windows Setup Dialog Box appears. The Windows Setup Dialog Box describes the Recovery Console option. To confirm the installation, click Yes.
5. Restart the computer. The next time that you start your computer, "Microsoft Windows Recovery Console" appears on the startup menu.
Alternatively, you can use a Universal Naming Convention (UNC)-established connection to install the Recovery Console from a network share point.
Note You may receive an error message that is similar the following:
Setup cannot continue because the version of Windows on your computer is newer than the version on the CD.
If this problem occurs, click the following article number to view the article in the Microsoft Knowledge Base:
898594 (http://support.microsoft.com/kb/898594/) You receive an error message if you try to install the Recovery Console on a Microsoft Windows XP Service Pack 2-based computer
Back to the top
How to use the Recovery Console
You can enable and disable services, format drives, read and write data on a local drive (including drives that are formatted to use the NTFS file system), and perform many other administrative tasks. The Recovery Console is particularly useful if you have to repair your computer by copying a file from a disk or CD-ROM to your hard disk, or if you have to reconfigure a service that is preventing your computer from starting correctly.
If you cannot start your computer, you can run the Recovery Console from the Microsoft Windows XP startup disks or the Windows XP CD-ROM. This article describes how to perform this task.
After Windows XP is installed on your computer, to start the computer and use the Recovery Console you require the Windows XP startup disks or the Windows XP CD-ROM.
For more information about how to create Startup disks for Windows XP (they are not included with Windows XP), click the following article number to view the article in the Microsoft Knowledge Base:
310994 (http://support.microsoft.com/kb/310994/) Obtaining Windows XP Setup boot disks
Note To start the computer from the Windows XP CD-ROM, you must configure the basic input/output system (BIOS) of the computer to start from your CD-ROM drive.
To run the Recovery Console from the Windows XP startup disks or the Windows XP CD-ROM, follow these steps:
1. Insert the Windows XP startup disk into the floppy disk drive, or insert the Windows XP CD-ROM into the CD-ROM drive, and then restart the computer.
Click to select any options that are required to start the computer from the CD-ROM drive if you are prompted.
2. When the "Welcome to Setup" screen appears, press R to start the Recovery Console.
3. If you have a dual-boot or multiple-boot computer, select the installation that you must access from the Recovery Console.
4. When you are prompted, type the Administrator password. If the administrator password is blank, just press ENTER.
5. At the command prompt, type the appropriate commands to diagnose and repair your Windows XP installation.
For a list of commands that are available in Recovery Console, type recovery console commands or help at the command prompt, and then press ENTER.
For information about a specific command, type help commandname at the command prompt, and then press ENTER.
6. To exit the Recovery Console and restart the computer, type exit at the command prompt, and then press ENTER.
Back to the top
How to use the Recovery Console command prompt
When you use the Recovery Console, you are working at a special command prompt instead of the ordinary Windows command prompt. The Recovery Console has its own command interpreter. To enter this command interpreter, you are prompted by Recovery Console to type the local Administrator password.
When the Recovery Console starts, you can press F6 to install a third-party SCSI or RAID driver, in case you need such a driver to access the hard disk. This prompt works the same as it does during installation of the operating system.
The Recovery Console takes several seconds to start. When the Recovery Console menu appears, a numbered list of the Windows installations on the computer appears. (Generally, only c:\Windows exists.) Press a number before you press ENTER, even when only one entry appears. If you press ENTER without selecting a number, the computer restarts and begins the process again.
When you see the prompt for %SystemRoot% (generally C:\Windows), you can start using the available commands for the Recovery Console.
Back
Command actions
The following list describes the available commands for the Recovery Console:
• Attrib changes attributes on one file or subdirectory.
• Batch executes commands that you specify in the text file, Inputfile. Outputfile holds the output of the commands. If you omit the Outputfile parameter, output appears on the screen.
• Bootcfg modifies the Boot.ini file for boot configuration and recovery.
• CD (Chdir) operates only in the system directories of the current Windows installation, removable media, the root directory of any hard disk partition, or the local installation sources.
• Chkdsk The /p switch runs Chkdsk even if the drive is not flagged as dirty. The /r switch locates bad sectors and recovers readable information. This switch implies /p. Chkdsk requires Autochk. Chkdsk automatically looks for Autochk.exe in the startup folder. If Chkdsk cannot find the file in the startup folder, it looks for the Windows 2000 Setup CD-ROM. If Chkdsk cannot find the installation CD-ROM, Chkdsk prompts the user for the location of Autochk.exe.
• Cls clears the screen.
• Copy copies one file to a target location. By default, the target cannot be removable media, and you cannot use wildcard characters. Copying a compressed file from the Windows 2000 Setup CD-ROM automatically decompresses the file.
• Del (Delete) deletes one file. Operates within the system directories of the current Windows installation, removable media, the root directory of any hard disk partition, or the local installation sources. By default, you cannot use wildcard characters.
• Dir displays a list of all files, including hidden and system files.
• Disable disables a Windows system service or driver. The variable service_or_driver is the name of the service or driver that you want to disable. When you use this command to disable a service, the command displays the service's original startup type before it changes the type to SERVICE_DISABLED. Note the original startup type so that you can use the enable command to restart the service.
• Diskpart manages partitions on hard disk volumes. The /add option creates a new partition. The /delete option deletes an existing partition. The variable device is the device name for a new partition (such as \device\harddisk0). The variable drive is the drive letter for a partition that you are deleting (for example, D). Partition is the partition-based name for a partition that you are deleting, (for example: \device\harddisk0\partition1) and can be used instead of the drive variable. The variable size is the size, in megabytes, of a new partition.
• Enable enables a Windows system service or driver. The variable service_or_driver is the name of the service or driver that you want to enable, and start_type is the startup type for an enabled service. The startup type uses one of the following formats:
SERVICE_BOOT_START
SERVICE_SYSTEM_START
SERVICE_AUTO_START
SERVICE_DEMAND_START
• Exit quits the Recovery Console, and then restarts the computer.
• Expand expands a compressed file. The variable source is the file that you want to expand. By default, you cannot use wildcard characters. The variable destination is the directory for the new file. By default, the destination cannot be removable media and cannot be read-only. You can use the attrib command to remove the read-only attribute from the destination directory. The option /f:filespec is required if the source contains more than one file. This option permits wildcard characters. The /y switch disables the overwrite confirmation prompt. The /d switch specifies that the files will not be expanded and displays a directory of the files in the source.
• Fixboot writes a new startup sector on the system partition.
• Fixmbr repairs the startup partition's master boot code. The variable device is an optional name that specifies the device that requires a new Master Boot Record. Omit this variable when the target is the startup device.
• Format formats a disk. The /q switch performs a quick format. The /fs switch specifies the file system.
• Help If you do not use the command variable to specify a command, help lists all the commands that the Recovery Console supports.
• Listsvc displays all available services and drivers on the computer.
• Logon displays detected installations of Windows and requests the local Administrator password for those installations. Use this command to move to another installation or subdirectory.
• Map displays currently active device mappings. Include the arc option to specify the use of Advanced RISC Computing (ARC) paths (the format for Boot.ini) instead of Windows device paths.
• MD (Mkdir) operates only within the system directories of the current Windows installation, removable media, the root directory of any hard disk partition, or the local installation sources.
• More/Type displays the specified text file on screen.
• Rd (Rmdir) operates only within the system directories of the current Windows installation, removable media, the root directory of any hard disk partition, or the local installation sources.
• Ren (Rename) operates only within the system directories of the current Windows installation, removable media, the root directory of any hard disk partition, or the local installation sources. You cannot specify a new drive or path as the target.
• Set displays and sets the Recovery Console environment variables.
• Systemroot sets the current directory to %SystemRoot%.
Recovery Console rules
Several environment rules are in effect while you are working in the Recovery Console. Type set to see the current environment. By default, these are the rules:
• AllowAllPaths = FALSE prevents access to directories and subdirectories outside the system installation that you selected when you entered the Recovery Console.
• AllowRemovableMedia = FALSE prevents access to removable media as a target for copied files.
• AllowWildCards = FALSE prevents wildcard support for commands such as copy and del.
• NoCopyPrompt = FALSE means that you are prompted by the Recovery Console for confirmation when overwriting an existing file.
How to delete the Recovery Console
To delete the Recovery Console:
1. Restart your computer, click Start, click My Computer, and then double-click the hard disk where you installed the Recovery Console.
2. On the Tools menu, click Folder Options, and then click the View tab.
3. Click Show hidden files and folders, click to clear the Hide protected operating system files check box, and then click OK.
4. At the root folder, delete the Cmdcons folder and the Cmldr file.
5. At the root folder, right-click the Boot.ini file, and then click Properties.
6. Click to clear the Read-only check box, and then click OK.
Warning: Modifying the Boot.ini file incorrectly may prevent your computer from restarting. Make sure that you delete only the entry for the Recovery Console. Also, change the attribute for the Boot.ini file back to a read-only state after you finish this procedure. Open the Boot.ini file in Microsoft Windows Notepad, and remove the entry for the Recovery Console. It looks similar to this:
C:\cmdcons\bootsect.dat="Microsoft Windows Recovery Console" /cmdcons
7. Save the file and close it.
How to install Recovery Console during an unattended installation
To install the Recovery Console during the unattended installation of Windows, you must use the [GuiRunOnce] section of the unattend.txt file.
Command1="path\winnt32 /cmdcons /unattend"
For more information about how to use the Unattend.txt file, see the Deployment Planning Guide of the Windows 2000 Server Resource Kit.
How to Use the Backup Utility to Back Up Files and Folders in Windows XP Home Edition
How to Use the Backup Utility to Back Up Files and Folders in Windows XP Home Edition
SUMMARY
This article describes how to use the Backup utility that is included with Windows XP to back up files and folders on your computer.
MORE INFORMATION
You can use the Backup utility in Windows XP to help you protect your data if your hard disk fails or if you accidentally delete files. You can use Backup to create a duplicate copy of all of the data on your hard disk, and then archive it on another storage device, such as a hard disk or a tape.
If the original data on your hard disk is either accidentally deleted or overwritten, or if it becomes inaccessible because of a hard-disk malfunction, you can easily restore the data from the disk or the archived copy by using the Restore Wizard.
The Backup utility is not included in the default installation of Windows XP Home Edition. The Backup icon is not present on the Start menu in Windows XP Home Edition, and Backup is not listed in the Add or Remove Programs tool in Windows XP Home Edition. The Backup utility is included on the Windows XP Home Edition CD-ROM in the ValueAdd folder. To use Backup, you must install the utility manually.
For additional information about how to install the Backup utility for Windows XP Home Edition, click the article number below to view the article in the Microsoft Knowledge Base:
302894 (http://support.microsoft.com/kb/302894/EN-US/) HOW TO: Install Backup from the CD-ROM in Windows XP Home Edition
NOTE: If you use Backup in Windows XP Home Edition, Automated System Recovery (ASR) is not a supported feature. You can use the current version of Windows XP Home Edition to start the configuration process for ASR, but you cannot complete the process
For additional information about errors that occur if you try to use the ASR feature with Windows XP Home Edition, click the article numbers below to view the articles in the Microsoft Knowledge Base:
302700 (http://support.microsoft.com/kb/302700/EN-US/) An Error Message Is Displayed When You Attempt to Use the Automated System Recovery Wizard
How to Back Up Files and Folders
After you install the Backup utility from the CD, complete the following procedure to create a backup of your files and folders.
NOTE: You must have administrative rights on your computer to back up files and folders.
1. Click Start, point to All Programs, point to Accessories, point to System Tools, and then click Backup.
2. After the Backup or Restore Wizard starts, click Advanced Mode.
NOTE: If the Backup and Restore Wizard does not start automatically, click Backup Wizard on the Tools menu to back up files.
3. Click the Backup tab.
4. Click New on the Job menu.
5. Click to select the check boxes next to the drives that you want to back up.
If you want to select specific files or folders, expand the drive on which these files or folders are located, and then click the check boxes next to the files or folders that you want to back up.
6. Click to select the System State check box that is located under My Computer in the left pane.
NOTE: If you want to back up your computer settings and your data files, Microsoft recommends that you back up all of the data on your computer plus the System State data that includes items such as the registry, the COM+ class registration database, files under Windows File Protection, and boot files.
7. In the Backup destination list, click the backup destination that you want to use.
8. If you clicked File in the previous step, type the full path and file name to which you want to back up data in the Backup media or file name box.
NOTE: You can also specify a network share as a destination for the backup file. Typically, backup files have the .bkf file name extension; however, you can use any file name extension.
9. Click Start Backup.
10. Under If the media already contains backups, perform one of the following steps:
• If you want to append this backup file to previous backup files, click Append this backup to the media.
• If you want to overwrite previous backup files with this backup file, click Replace the data on the media with this backup.
11. Click Advanced.
12. Click to select the Verify data after backup check box.
13. In the Backup Type box, click the type of backup that you want to create.
You can select any of the following backup types:
• Normal
• Copy
• Differential
• Incremental
• Daily
When you click a backup type, a description of that backup type appears under "Description."
14. Click OK, and then click Start Backup.
15. When the backup is complete, click Close.
You can use Backup to back up and restore data on either FAT16, FAT32, or NTFS volumes. However, if you back up data from an NTFS volume that is used in Windows XP, Microsoft recommends that you restore the data to an NTFS volume that is used in Windows XP. If you do not do so, you can lose data and some file and folder features.
Some file systems might not support all of the features of other file systems. For example, the following features are lost if you back up data from an NTFS volume that is used in Windows XP, and then restore the data to a FAT volume or an NTFS volume that is used in Windows NT 4.0:
• Permissions
• Encrypting File System (EFS) settings
• Disk quota information
• Mounted drive information
• Remote Storage information
If you want to back up your computer, Microsoft recommends that you back up all of the data on your computer and the System State data, which includes the registry. You can only back up the System State data on a local computer. You cannot back up the System State data on a remote computer.
How to use Disk Management to configure basic disks in Windows XP
How to use Disk Management to configure basic disks in Windows XP
INTRODUCTION
This step-by-step article describes how to use the Windows XP Disk Management snap-in to configure a basic disk and prepare it for use. This article also describes how to create and delete partitions, and how to format volumes with the FAT, FAT32, or NTFS file systems.
MORE INFORMATION
Basic disks and volumes
Basic disk storage supports partition-oriented disks. A basic disk is a physical disk that contains primary partitions, extended partitions, or logical drives. Partitions and logical drives on basic disks are also known as basic volumes. You can create up to four primary partitions, or three primary partitions and one extended partition, that contain logical drives.
If you are running Windows XP Professional and one or more of the following operating systems on the same computer, you must use basic volumes, because these operating systems cannot access data that is stored on dynamic volumes:
• Windows XP Home Edition
• Microsoft Windows NT 4.0 or earlier
• Microsoft Windows Millennium Edition (Me)
• Microsoft Windows 98
• Microsoft Windows 95
• MS-DOS
How to use Disk Management
To start Disk Management:
1. Log on as administrator or as a member of the Administrators group.
2. Click Start, click Run, type compmgmt.msc, and then click OK.
3. In the console tree, click Disk Management. The Disk Management window appears. Your disks and volumes appear in a graphical view and list view. To customize how you view your disks and volumes in the upper and lower panes of the window, point to Top or Bottom on the View menu, and then click the view that you want to use.
NOTE: Microsoft recommends that you create a full back up of your disk contents before you make any changes to your disks or volumes.
How to create a new partition or a new logical drive
To create a new partition or logical drive on a basic disk:
1. In the Disk Management window, complete one of the following procedures, and then continue to step 2:
• To create a new partition, right-click unallocated space on the basic disk where you want to create the partition, and then click New Partition.
• To create a new logical drive in an extended partition, right-click free space on an extended partition where you want to create the logical drive, and then click New Logical Drive.
2. In the New Partition Wizard, click Next.
3. Click the type of partition that you want to create (either Primary partition, Extended partition, or Logical drive), and then click Next.
4. Specify the size of the partition in the Partition size in MB box, and then click Next.
5. Decide whether to manually assign a drive letter, let the system automatically enumerate the drive, or do not assign a drive letter to the new partition or logical drive, and then click Next.
6. Specify the formatting options you want to use by using one of the following procedures:
• If you do not want to format the partition, click Do not format this partition, and then click Next.
• If you want to format the partition, click Format this partition with the following settings, and then complete the following procedure in the Format dialog box:
a. Type a name for the volume in the Volume label box. This is an optional step.
b. Click the file system that you want to use in the File system box.
You can change the disk allocation unit size, and then specify whether to perform a quick format, or enable file and folder compression on NTFS volumes.
Click Next.
7. Confirm that the options that selected are correct, and then click Finish.
The new partition or logical drive is created and appears in the appropriate basic disk in the Disk Management window. If you chose to format the volume in step 6, the format process now starts.
How to format a basic volume
To format a partition, logical drive or basic volume:
1. In the Disk Management window, right-click the partition or logical drive that you want to format (or reformat), and then click Format.
2. In the Format dialog box, type a name for the volume in the Volume label box. This is an optional step.
3. Click the file system that you want to use in the File system box. If you want, you can also change the disk allocation unit size, specify whether you want to perform a quick format, or enable file and folder compression on NTFS volumes.
4. Click OK.
5. Click OK when you are prompted to format the volume. The format process starts.
How to view the properties of a basic volume
To view the properties of a partition or logical drive:
1. In the Disk Management window, right-click the partition or logical drive that you want, and then click Properties.
2. Click the appropriate tab to view the appropriate property.
How to delete a partition or a logical drive
To delete a partition or logical drive:
1. In the Disk Management window, right-click the partition or logical drive that you want to delete, and then click Delete Partition or Delete Logical Drive.
2. Click Yes when you are prompted to delete the partition or logical drive. The partition or logical drive is deleted.
Important
• When you delete a partition or a logical drive, all the data on that partition or logical drive, and the partition or the logical drive, are deleted.
• You cannot delete the system partition, boot partition, or a partition that contains the active paging (swap) file.
• You cannot delete an extended partition unless the extended partition is empty. All logical drives in the extended partition must be deleted before you can delete the extended partition.
Troubleshooting
Disk Management displays status descriptions in graphical view and under the Status column of list view to inform you of the current status of the disk or volume. Use these status descriptions to help you detect and troubleshoot disk and volume failures. The following is a partial list of disk and volume status descriptions:
• Online
This is the normal disk status when the disk is accessible and functioning correctly.
• Healthy
This is the normal volume status when the volume is accessible and functioning correctly.
• Unreadable
The disk is inaccessible because of possible hardware failure, corruption, or I/O errors.
To troubleshoot this issue, restart the computer or rescan the disk to try and return the disk to Online status. To rescan the disk, open Computer Management, and then click Disk Management. On the Action menu, click Rescan Disks.
For a complete list of disk and volume status descriptions and troubleshooting procedures, see Disk Management Help. In the Disk Management snap-in or Computer Management window, click Help on the Action menu.
How to use Backup to protect data and restore files and folders on your computer in Windows XP and Windows Vista
How to use Backup to protect data and restore files and folders on your computer in Windows XP and Windows Vista
INTRODUCTION
This article contains information about how to use the Backup program in Windows XP and in Windows Vista to help protect data and restore files and folders on your computer.
The Backup utility in Windows XP and in Windows Vista helps you protect your data if your hard disk stops working or your files are accidentally erased. With Backup, you can create a copy of all the data on your hard disk, and then archive it on another storage device, such as a hard disk or a tape.
If the original data on your hard disk is accidentally erased, overwritten, or becomes inaccessible because of a hard disk malfunction, you can restore the data from the disk or the archived copy by using the Restore Wizard or the Automated System Recovery Wizard.
Back to the top
MORE INFORMATION
How to use Backup to protect data and restore files and folders
Note You must have administrative or backup operator credentials on your computer to back up and restore files and folders. Backup operators and administrators can back up and restore encrypted files and folders without decrypting the files or folders.
To make sure that you have the latest information about how to use the Backup program in Windows XP and in Windows Vista, visit the following Microsoft Web site
How To Use the Files and Settings Transfer Wizard By Using the Windows XP CD-ROM
How To Use the Files and Settings Transfer Wizard By Using the Windows XP CD-ROM
SUMMARY
This step-by-step article describes how to use the Files and Settings Transfer Wizard by using the Microsoft Windows XP CD-ROM. You can use the Files and Settings Transfer Wizard to transfer settings from one computer to another. This includes your personalized settings for Microsoft Internet Explorer and Microsoft Outlook Express, as well as desktop, display, and dial-up connection settings.
How to Use the Files and Settings Transfer Wizard By Using the Microsoft Windows XP CD-ROM
To use the Files and Settings Transfer Wizard by using the Microsoft Windows XP CD-ROM, first complete the steps in the "Collect the Files and Settings from the Old Computer" section of this article, and then complete the steps in the "Transfer the Files and Settings to the New Computer" section of this article.
Collect the Files and Settings from the Old Computer
1. Start the File and Settings Transfer Wizard on the computer from which you want to collect the files and settings:
a. Insert the Windows XP CD-ROM into the CD-ROM or DVD-ROM drive.
b. Right-click Start, click Explore, and then open the Support\Tools folder on the Windows XP CD-ROM.
c. Double-click the Fastwiz.exe file to start the Files and Settings Transfer Wizard.
2. Click Next.
3. Click Old Computer, and then click Next.
4. Click the transfer method that you want to use, for example, Floppy drive or other removable media, and then click Next.
5. On the What do you want to transfer? screen, click the selections that you want to transfer, and then click Next.
NOTE: When you make a selection, a summary of the items to be transferred appears in the Based on your current selection, the following items will be transferred list. You can use this list to verify that the settings or files that you want will be transferred.
6. The Wizard collects your files and settings. If you selected Floppy drive or other removable media in step 3, you are prompted to insert the media (floppy disk, or other removable media) and then click OK.
7. Click Finish.
Transfer the Files and Settings to the New Computer
1. Log on to the Windows XP-based computer as the user that you want to restore settings for.
2. Click Start, point to All Programs, point to Accessories, point to System Tools, and then click Files and Settings Transfer Wizard.
3. Click Next.
4. On the Which computer is this screen, click New computer, and then click Next.
5. Click I don't need the Wizard Disk. I have already collected my files and settings from my old computer, and then click Next.
6. On the Where are the files and settings? screen, click the same transfer method that you previously selected. For example, Floppy drive or other removable media.
NOTE: If you click Other (for example, a removable drive or network drive), browse to or type the location that contains the collected files and settings.
7. Click Next. If you selected Floppy drive or other removable media, you are prompted to insert disk 1 and then click OK.
8. Click Finish.
9. When you receive the following message, click Yes:
You need to log off for the changes to take effect. Do you want to log off now?
10. Log on to the computer to apply your transferred settings.
Troubleshooting
Some settings may not be restored to your Windows XP-based computer. If the computer from which the files and settings have been transferred contained settings for devices that are either not available on, or incompatible with Windows XP, these settings will not be transferred. A list of files or folders that could not be restored to their original locations appears on the Completing the Files and Settings Transfer Wizard screen of the Files and Settings Transfer Wizard.
The following list includes types of items that may not be transferred:
• Third-party driver files for devices that are not installed on the Windows XP-based computer.
• Network printers that are not available on the Windows XP-based computer
How to use the Files and Settings Transfer Wizard with a wizard disk in Windows XP
How to use the Files and Settings Transfer Wizard with a wizard disk in Windows XP
SUMMARY
This article describes how to use the Files and Settings Transfer Wizard with a Wizard Disk.
MORE INFORMATION
How to use the File and Settings Transfer Wizard
You can use the Files and Settings Transfer Wizard to transfer settings from one computer to another computer. The settings that you can transfer include your personalized settings for Microsoft Internet Explorer and Outlook Express, desktop settings, display settings, and dial-up connection settings.
You can also use the Files and Settings Transfer Wizard to create a backup copy of your Windows XP settings. You can use this backup copy of your settings to restore your files and settings if you have to reinstall Windows XP.
Create a Wizard Disk
To create a Wizard Disk by using the Files and Settings Transfer Wizard, follow these steps:
1. Click Start, point to All Programs, point to Accessories, point to System Tools, and then click Files and Settings Transfer Wizard.
2. On the Welcome to the Files and Settings Transfer Wizard screen, click Next.
3. On the Which computer is this screen, click Next.
4. On the Do you have a Windows XP CD screen, click I want to create a Wizard Disk in the following drive.
5. In the drive list, click the drive that you want. For example, 3-1/2 Floppy (A:), and then click Next.
6. Insert a blank formatted disk into the drive, and then click OK to create the Wizard Disk.
7. Remove the Wizard Disk, and then click Cancel.
Collect the files and settings from the old computer
1. Start the File and Settings Transfer Wizard on the computer that you want to collect the files and settings from:
a. Insert the Wizard Disk into the drive of the computer that you want.
b. Click Start, and then click Run.
c. In the Open box, type:
drive:Fastwiz
Where drive is the drive that contains the Wizard Disk (such as A:Fastwiz).
d. Click OK.
2. On the Welcome to the Files and Settings Transfer Wizard screen, click Next.
3. On the Select a transfer method screen, click the transfer method that you want. For example, Floppy drive or other removable media, and then click Next.
4. On the What do you want to transfer? screen, click the selection that you want, and then click Next.
Note When you make a selection, a summary of the items that will be transferred appears in the Based on your current selection, the following items will be transferred list. You can use this list to verify that the settings or the files that you want will be transferred.
The Wizard collects your files and settings. If you selected Floppy drive or other removable media in step 3, you are prompted to insert the media disk. When you are prompted, click OK.
5. On the Completing the Collection Phase screen, click Finish.
Transfer the files and settings to the new computer
1. Log on to the Windows XP-based computer.
2. Click start, point to All Programs, point to Accessories, point to System Tools, and then click Files and Settings Transfer Wizard.
3. On the Welcome to the Files and Settings Transfer Wizard screen, click Next.
4. On the Which computer is this screen, click New computer, and then click Next.
5. On the Do you have a Windows XP CD screen, click I don't need the Wizard Disk. I have already collected my files and settings from my old computer, and then click Next.
6. On the Where are the files and settings? screen, click the same transfer method that you selected in step 3 in the "Collect the files and settings from the old computer" section. For example, Floppy drive or other removable media.
Note If you click Other (for example, a removable drive or network drive), locate or type the location that contains the collected files and settings.
Click Next. If you selected Floppy drive or other removable media, you are prompted to insert disk 1. When you are prompted, click OK.
The Wizard transfers the files and settings.
7. On the Completing the Files and Settings Transfer Wizard screen, click Finish. You receive the following message:
You need to log off for the changes to take effect. Do you want to log off now?
8. Click Yes to log off.
9. Log on to the computer to apply your transferred settings.
Troubleshooting
Some settings may not be restored to your Windows XP-based computer. Settings for devices that are either not available on or incompatible with Windows XP will not be transferred. A list of files or folders that were not be restored to their original locations appears on the Completing the Files and Settings Transfer Wizard screen of the Files and Settings Transfer Wizard.
The following types of items may not be transferred:
• Third-party driver files for devices that are not installed on the Windows XP-based computer.
• Network printers that are not available on the Windows XP-based computer.
The purpose of the Boot.ini file in Windows XP
The purpose of the Boot.ini file in Windows XP
INTRODUCTION
This article describes the purpose and contents of the Boot.ini file.
MORE INFORMATION
Windows (specifically Ntldr) uses the Boot.ini file to determine which operating system options to display when the Startup program is running. By default, Boot.ini is not flagged as a read-only system file and generally does not require any manual modification.
If you must change the contents of this file, use the System tool in Control Panel:
1. Click Start button, click Control Panel, and then double-click System.
2. Click the Advanced tab, and then click Settings under Startup and Recovery.
Typically, the Boot.ini file contains the following data:
[boot loader]
timeout=30
default=scsi(0)disk(0)rdisk(0)partition(1)\winnt
[operating systems]
scsi(0)disk(0)rdisk(0)partition(1)\winnt = "Windows NT" /NODEBUG C:\ = "Previous Operating System on C:\"
The following list describes the meaning of the data in the Boot.ini file:
• The "timeout" variable specifies how long Windows waits before choosing the default operating system.
• The "default" variable specifies the default operating system.
• The term "scsi(0)" means that the primary controller (that is frequently the only controller) is responsible for the device. If there are two SCSI controllers, and the disk is associated with the second controller, the controller is named "scsi(1)".
If the system uses IDE, enhanced IDE (EIDE), or Enhanced Small Device Interface (ESDI) drives, or if the system uses a SCSI adapter that does not have a built-in BIOS, replace "scsi" with "multi".
• The term "disk(0)" refers to the SCSI logical unit (LUN) to use. This may be a separate disk, but most SCSI setups have only one LUN for each SCSI ID.
• The term "rdisk(0)" refers to physical disk 1.
• The term "partition(1)" is the partition on the first drive in the computer. If there are two partitions, partition C is partition(1) and partition D is partition(2).
• A multi-boot parameter calls for checking the Winnt folder to start from a specified SCSI controller's disk and partition.
• "/NODEBUG" specifies that no debugging information is being monitored. Debugging information is useful only for developers.
• You can add the /SOS option to display driver names while the drivers are being loaded. By default, the OS Loader screen only shows progress dots.
• "Previous Operating System on C:\" implies that the "previous operating system" is MS-DOS, because "C:\" is an MS-DOS path.
Monday, May 19, 2008
Installing Windows XP
Installing Windows XP
The first thing which you need to do it to decide what operating system you would like to use. The most common provided with new PC’s is Windows Vista, although there are better alternatives such as Windows XP or Linux.
XP and Vista are expensive when bought retail, but if you order an OEM version, they’re between £50 and £100. With an OEM version you must be buying some hardware at the same time, and you won’t receive support from Microsoft. Linux is free and comes in many varieties, I use it on my laptop, and I’m impressed with it.
From now on, this guide will assume that you have chosen Windows XP, as it is the one I recommend if you have no or little experience with installing an operating system.
The first thing you need to check is that your PC is set to boot from CD/DVD before it looks on a hard drive. To do this, you need to edit the boot priority in the BIOS. Typically, when the PC is first switching on you get a message that says something like:
Code:
“Press DEL to enter setup”
Press the correct key and you will enter the BIOS Setup. Most BIOS’s vary, although you need to look for something like Boot Order, or Boot sequence, and you must change the CD/DVD to be booted before the hard drive. Make sure when you have finished you press Save Settings and Exit.
Once this is done, enter the OS setup CD into your CD/DVD Drive, and reboot the PC. If prompted to do so, press a key to start the XP Setup. A blue screen will appear, don’t press anything until you get to this:
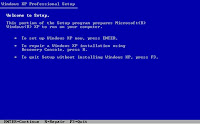
Press Enter.
Read the terms and conditions, then press F8.
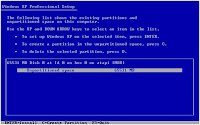 If you get this, then you need to press enter, and do a full NTFS format (not quick). If you are not using a brand new hard drive, but want to start fresh, press F to format, and follow the instructions on screen. If you aren’t using a new hard drive, and you don’t want to format, follow the instructions on screen.
Once formatted, setup will start copying files to your hard drive. When that it finished, it will automatically reboot and carry on with the installation. When it reboots, if it asks if you want to boot from the CD, you don’t, so don’t press anything! If you are setting up Vista, it’s a similar process, but it looks a bit friendlier, and gives better instructions on what to do.
Eventually you will get to this screen:
Change the settings accordingly, and if you don’t use a US Keyboard, make sure to change it (I use a UK Keyboard, which is only slightly different). Press next, enter your name, and company (if necessary), and you will then be prompted to enter your product key. The version I am installing has Service Pack 2 integrated, although there is now a newer Service Pack 3 one. If your disk has SP3, then it is not necessary to insert the code here, you can do it later on.
Press next, and you can change your computers name (on a network), and enter an administrator password. I strongly recommend that you enter a password, although it will work without one.
Press next again, set the time, date and which time zone you’re in, and press next. Setup will continue. In about 2 minutes, the next box should appear. Click typical network settings (unless you know you need to setup your network manually). Press next, enter the workgroup you wish your computer to be in (if you don’t know, leave it as the default). If you have a dial up modem, you will be asked to enter settings about it.
Now you just have to wait!
Eventually you will get this:
Almost done now! A small video clip is played. If you can hear sound, that means XP has got drivers for you sound card, and you have speakers attached and plugged in. If not, that can be sorted later.
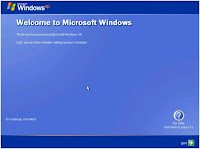
Press next, and I recommend you select “Help Protect my PC by turning on automatic updates” and press next again. Press skip at the bottom right. I wouldn’t bother registering with Microsoft, but you can if you want. Press next and enter the user accounts you wish to have on that PC. Press next, then finish. You user is loaded and XP is installed!
 Now is the time to install all those disks which came with the hardware you bought. Install your modem (if you need to), install antivirus and firewall etc. Here is a list of some of the software which I recommend (free):
AVG Antivirus 8.0
Zone Alarm Free
VLC Media Player
Firefox (Web browser)
Ad-Aware SE
Spybot S&D
The first thing which you need to do it to decide what operating system you would like to use. The most common provided with new PC’s is Windows Vista, although there are better alternatives such as Windows XP or Linux.
XP and Vista are expensive when bought retail, but if you order an OEM version, they’re between £50 and £100. With an OEM version you must be buying some hardware at the same time, and you won’t receive support from Microsoft. Linux is free and comes in many varieties, I use it on my laptop, and I’m impressed with it.
From now on, this guide will assume that you have chosen Windows XP, as it is the one I recommend if you have no or little experience with installing an operating system.
The first thing you need to check is that your PC is set to boot from CD/DVD before it looks on a hard drive. To do this, you need to edit the boot priority in the BIOS. Typically, when the PC is first switching on you get a message that says something like:
Code:
“Press DEL to enter setup”
Press the correct key and you will enter the BIOS Setup. Most BIOS’s vary, although you need to look for something like Boot Order, or Boot sequence, and you must change the CD/DVD to be booted before the hard drive. Make sure when you have finished you press Save Settings and Exit.
Once this is done, enter the OS setup CD into your CD/DVD Drive, and reboot the PC. If prompted to do so, press a key to start the XP Setup. A blue screen will appear, don’t press anything until you get to this:

Press Enter.
Read the terms and conditions, then press F8.
 If you get this, then you need to press enter, and do a full NTFS format (not quick). If you are not using a brand new hard drive, but want to start fresh, press F to format, and follow the instructions on screen. If you aren’t using a new hard drive, and you don’t want to format, follow the instructions on screen.
Once formatted, setup will start copying files to your hard drive. When that it finished, it will automatically reboot and carry on with the installation. When it reboots, if it asks if you want to boot from the CD, you don’t, so don’t press anything! If you are setting up Vista, it’s a similar process, but it looks a bit friendlier, and gives better instructions on what to do.
Eventually you will get to this screen:
Change the settings accordingly, and if you don’t use a US Keyboard, make sure to change it (I use a UK Keyboard, which is only slightly different). Press next, enter your name, and company (if necessary), and you will then be prompted to enter your product key. The version I am installing has Service Pack 2 integrated, although there is now a newer Service Pack 3 one. If your disk has SP3, then it is not necessary to insert the code here, you can do it later on.
Press next, and you can change your computers name (on a network), and enter an administrator password. I strongly recommend that you enter a password, although it will work without one.
Press next again, set the time, date and which time zone you’re in, and press next. Setup will continue. In about 2 minutes, the next box should appear. Click typical network settings (unless you know you need to setup your network manually). Press next, enter the workgroup you wish your computer to be in (if you don’t know, leave it as the default). If you have a dial up modem, you will be asked to enter settings about it.
Now you just have to wait!
Eventually you will get this:

Almost done now! A small video clip is played. If you can hear sound, that means XP has got drivers for you sound card, and you have speakers attached and plugged in. If not, that can be sorted later.

Press next, and I recommend you select “Help Protect my PC by turning on automatic updates” and press next again. Press skip at the bottom right. I wouldn’t bother registering with Microsoft, but you can if you want. Press next and enter the user accounts you wish to have on that PC. Press next, then finish. You user is loaded and XP is installed!
 Now is the time to install all those disks which came with the hardware you bought. Install your modem (if you need to), install antivirus and firewall etc. Here is a list of some of the software which I recommend (free):
AVG Antivirus 8.0
Zone Alarm Free
VLC Media Player
Firefox (Web browser)
Ad-Aware SE
Spybot S&D
Subscribe to:
Posts (Atom)


